


.svg)
What constitutes an interaction?
Interactions in design refer to how things on a website or app respond to actions like clicks, scrolls, or mouse movements. We can control how elements behave by setting triggers (like clicking a button) and animations (what happens when you click).In the Webflow Designer, the Interactions panel allows you to create various interactive effects based on these triggers and animations, giving you the power to customize your site the way you want.
Why you should have an animated site?
Having animations on your website isn't just about making things look cool; it can actually increase visitor engagement and boost conversions. Studies have shown that animated elements grab people's attention and may influence their decision to make a purchase. When used smartly with clear calls-to-action, animations can guide users through your site and make it easier for them to navigate.
However, it's crucial to be mindful of accessibility. Some people might be sensitive to excessive motion or flashing effects due to various conditions like vestibular disorders. So, while animations can enhance user experience, it's important to ensure they cater to everyone visiting your site, no matter their preferences or needs.
Types of triggers
Triggers are essential in controlling how interactions function on a website or app. They initiate animations or design changes in response to specific actions. Common triggers include clicks, scrolls, hovers, mouse movements, and page loading.
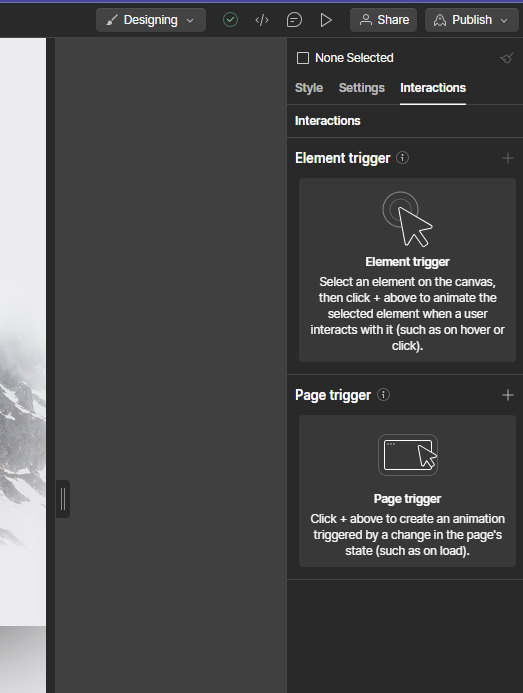
Element triggers - focus on individual elements on a page. For instance, clicking a button or hovering over an image can trigger an animation specific to that element.
Page triggers, on the other hand, are global and apply to the entire webpage. They are perfect for creating effects like parallax scrolling or animations that occur when the page loads. These triggers activate animations when the page state changes, such as during loading or while users scroll, creating a dynamic and engaging experience.
Incorporating page triggers into your Webflow project enhances the user experience, making it more immersive and interactive. By experimenting with different triggers and animations, you can find the perfect balance for your site. Your visitors will appreciate the added interactivity and polish.
Understanding and effectively using different types of triggers allows designers to create engaging, dynamic user experiences that captivate visitors and bring life to a website or app.
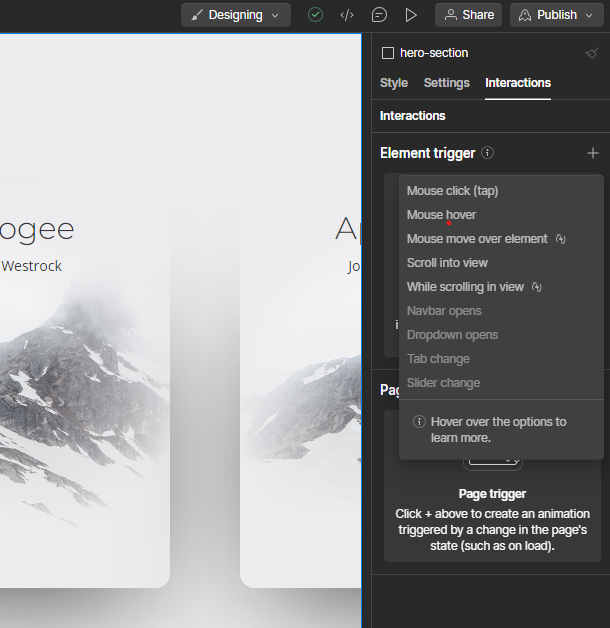
Custom Element Triggers - In addition to standard triggers, you can add custom animations for specific interactions with elements like navbars, dropdowns, tabs, and sliders. To access these trigger types, simply select the corresponding element (e.g., navbar, dropdown) on the canvas. This allows you to create tailored animations that enhance the interactivity and user experience of your site.
How to configure a trigger?
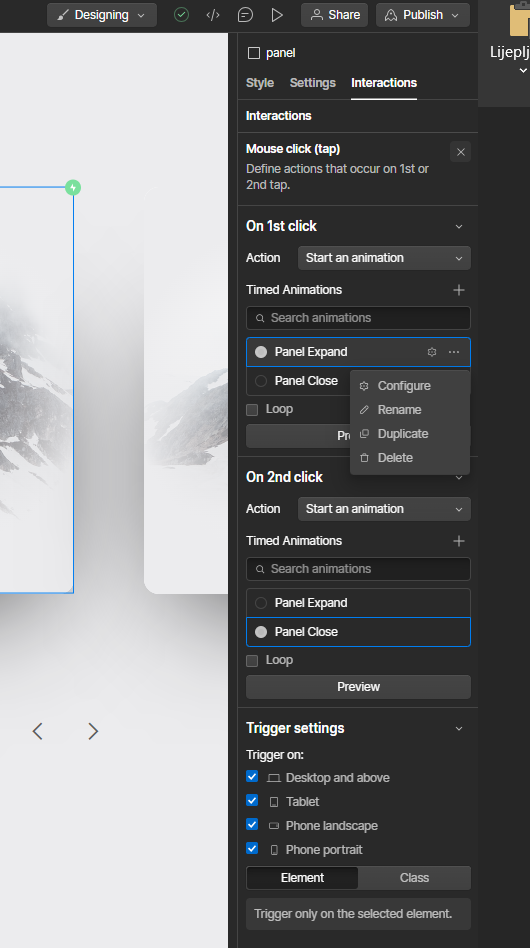
Once you've chosen the trigger type in the Interactions panel, you can fine-tune its behavior by specifying the action you want to occur when the trigger is activated. The available action options vary depending on the type of trigger selected. For example, with the "Mouse click (tap)" element trigger, you can define distinct actions for the first and second clicks, allowing for precise control over user interactions.
How to set up an animation?
Once you've established a trigger, you can configure an animation tailored to your website's needs. Here's how you can set up both pre-built and custom animations:
Setting a Pre-built Animation
Pre-built animations, such as 'appear & disappear' and emphasis animations, provide fast solutions without requiring extensive customization. You can easily choose from these available options directly within the Designer interface.
Setting a Custom Animation
- Choose Your Trigger:
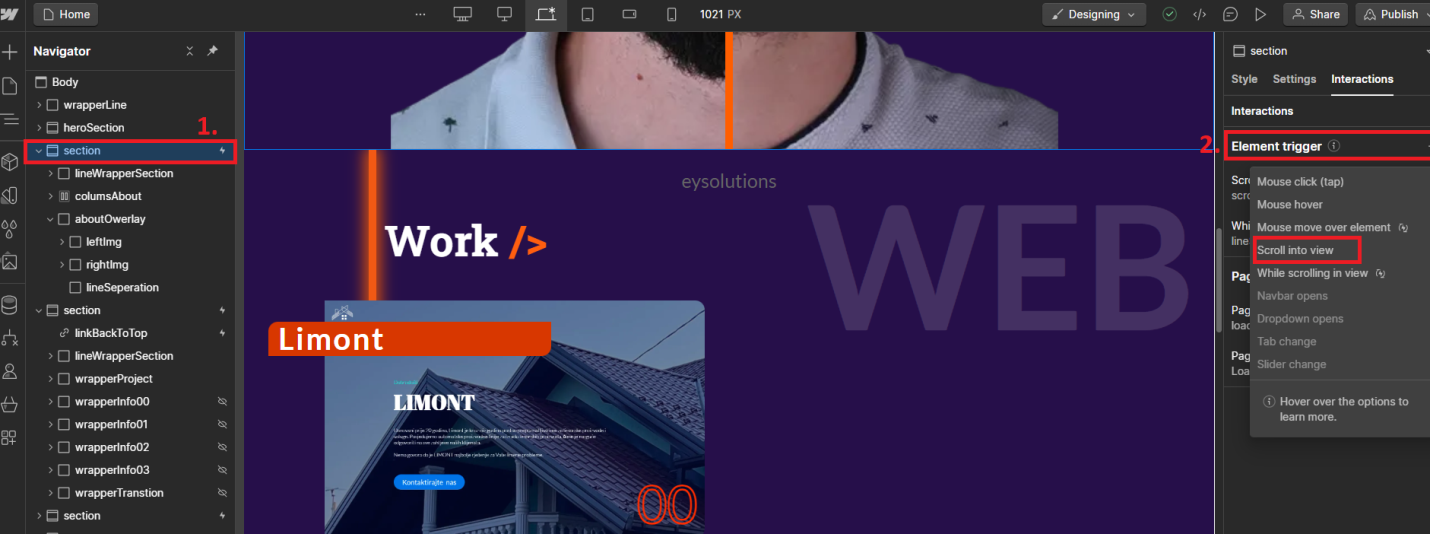
- Set either an Element trigger (e.g., mouse hover, scroll into view) or a Page trigger (e.g., Page load, page scrolled).
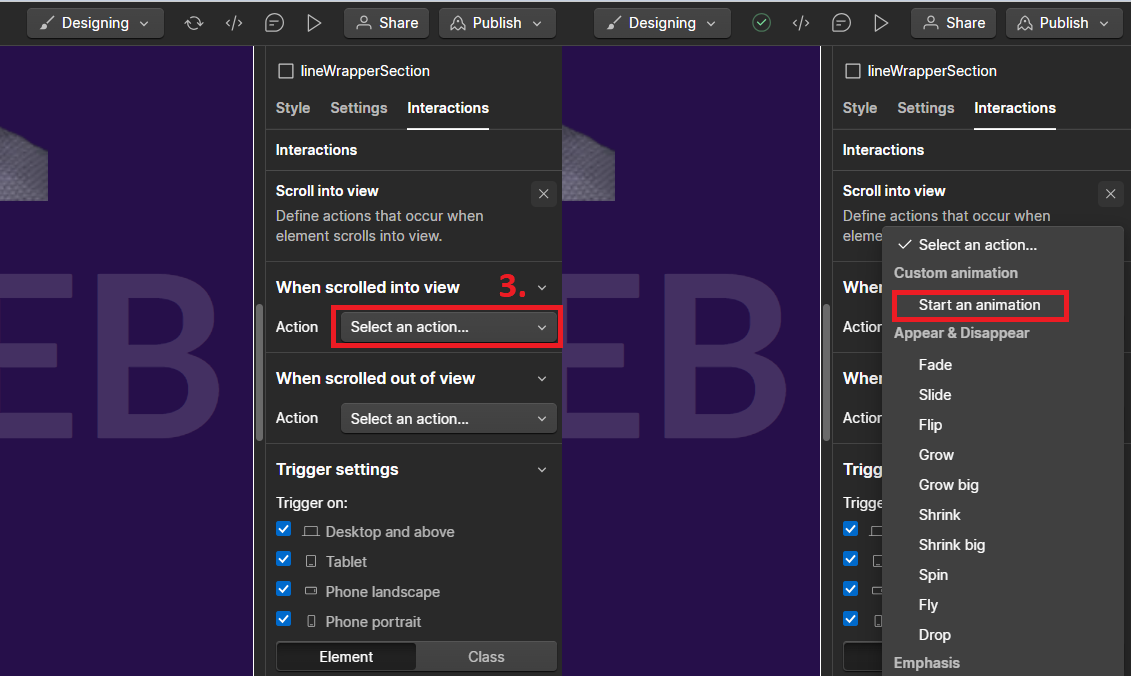
- Select the Action:
- Open the Action dropdown corresponding to the trigger (e.g., On hover for mouse hover trigger)
- Choose "Start an Animation":
- Under Custom animation, select "Start an animation".
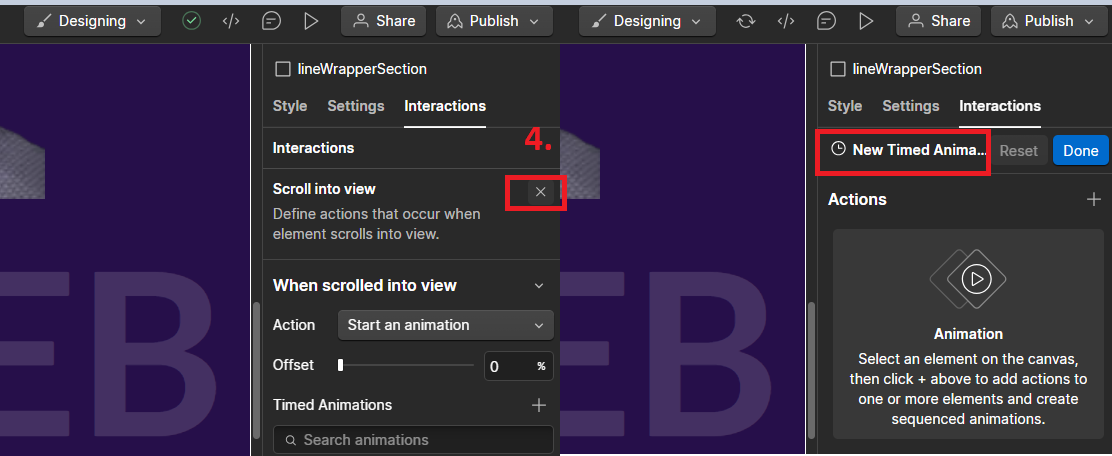
- Define the Animation:
- Click the "+" next to Timed animations to create a new animation.
- Name your animation in the designated field.
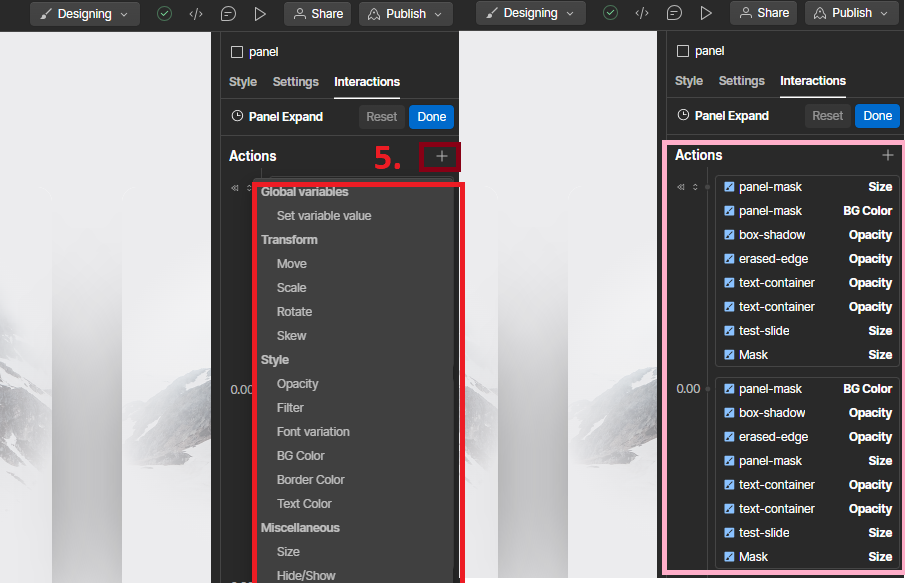
- Add Animation Effects:
- To add an action, click the "+" icon located next to Actions. From there, you can select various animation options, including Global variables, Transform, Style, or mixed animations, from the dropdown menu.
Additional animation settings
Scroll Offset
When using certain page scrolling triggers like "Scroll into view" or "While scrolling in view (continuous)," you can specify a scroll offset. This feature delays the interaction until the page has been scrolled to a certain percentage. A longer scroll offset means visitors will scroll further before the interaction begins.
Delay
Customize animation delays to occur after a specific amount of time has passed. This setting allows for precise timing of animations.
Smoothing
Adjust the smoothing of animations to control how quickly they respond to mouse movement. Smoothing determines the fluidity and responsiveness of animations.
Action targets
By default, any action you add to your animation timeline affects the selected element. However, you can change the target of an action in one of two ways. Firstly, you can replace the target element the action affects. To do this, right-click an action in the animation timeline, then click "Change target," and select a different element on the canvas to add the action to. Additionally, you can choose whether the action affects only the selected element, all elements with the same class, or the interaction trigger itself.
Trigger an animation on specific breakpoints
To trigger an animation on specific devices, you can choose the device breakpoints where you want the animation to take place. By default, animations trigger on all breakpoints, including Desktop and above, tablet, phone landscape, and phone portrait.
For instance, if you want mouse click interactions to happen exclusively on Desktop and above breakpoints, visitors will be able to trigger the interaction with their mouse on these devices.
By default, interactions set on an element occur only when you interact with that particular element. This behavior remains consistent across all device breakpoints.

Deleting and removing unused triggers and animations
To remove triggers or animations, you'll need to access the Interactions Panel. Once there, hover over the trigger or animation you wish to delete and click on the trash icon that appears next to its name.
Deleting a trigger or animation from the Interactions Panel doesn't completely erase it from your site. Instead, it allows you to reuse them on other elements or triggers. However, you can improve site performance by cleaning up unused triggers or animations. To do this, navigate to the Interactions Panel, select "Clean Up," choose the animations you want to delete or keep, and confirm your selection by clicking "Delete." This helps you efficiently manage triggers and animations to ensure your site performs at its best.

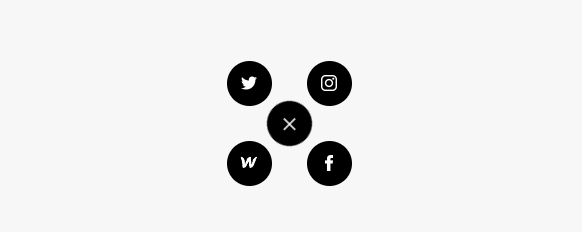
Animation For Social Media Button

Initial Setup
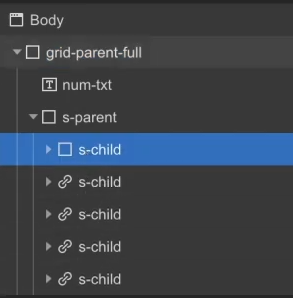
- Add the parent div:
- Create a div and name it s-parent.
- Set its width to 45px, height to 45px, and position to relative.
- Add the child div:
- Inside s-parent, create another div and name it s-child.
- Set its width and height to 45px and position to absolute.
- Set display to horizontal, align items to center, justify content to center.
- Set z-index to 5, background color to black, and border radius to 70px.
- Add an image inside the child div:
- Inside s-child, add an image and set its width to 20px.
- Add link blocks inside the parent div:
- Inside s-parent, add a link block and give it the same class s-child.
- Add a combo class and name it s-img.
- Change its z-index to 0.
- Inside each link block, add an image and set its width to 20px.
- Copy and paste this link block three more times, changing the image for each one.
Creating the Animation
- Initial Setup for Animation:
- Select the s-parent div and click on "Interaction".
- Click on the plus sign next to "Element Trigger" and set it to trigger on a mouse click.
- Next to "Action", choose "Start anAnimation" from the dropdown list.
- Click the plus sign below and name your animation (e.g., animation).
- Set Initial Positions:
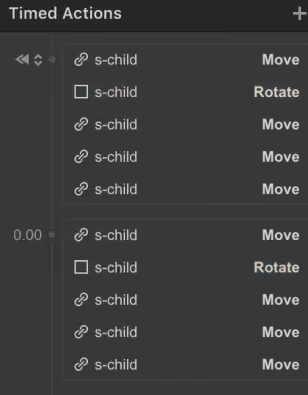
- Select the first s-child s-img link block.
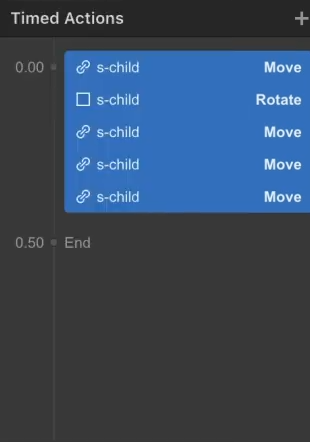
- Next to "TimedActions", clickthe plus signandchoosethe "Move" animation.
- Next to "Affect", choose "Selected Element" from the dropdown list.
- Set "Timing" to "Set as Initial State" and set the x and y axes to 0px.
- Repeat this step for the other three link blocks.
- Set Initial Rotation:
- Select the s-child div.
- Choose the "Rotate" animation.
- Set "Affect" to "Selected Element", "Timing" to "Set as Initial State", and set the z-axis rotation to 0 degrees.
Define Animation Movements
- Set Movement for Each Link Block:
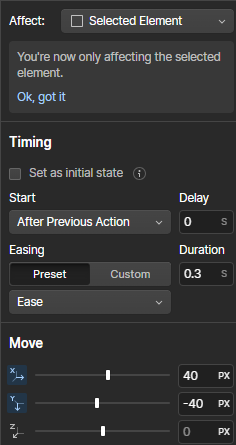
- Select one s-child s-img link block.
- Add the "Move" animation again.
- Set "Affect" to "Selected Element", and uncheck "Set as Initial State" under "Timing".
- Under "Easing", select "ease" and set the duration to 0.3s.
- Set the x and y axes:
- First link block: x and y to 40px.
- Second link block: x and y to -40px.
- Third link block: x to -40px and y to 40px.
- Fourth link block: x to 40px and y to -40px.
Set Rotation for Center Plus Sign:
- Select the s-child div.
- Add the "Rotate" animation.
- Set "Affect" to "Selected Element", uncheck "Set as Initial State" under "Timing".
- Under "Easing", select "ease" and set the duration to 0.3s.
- Set the z-axis rotation to 45 degrees.
DefineAnimation for SecondClick
- Return to Initial State on Second Click:
- Under "On 2nd Click", select "Start Animation" and click on the plus sign to name your animation for the second click.
- For each s-child s-img link block:
- Add the "Move" animation.
- Uncheck "Set as Initial State" under "Timing".
- Under "Easing", select "ease" and set the duration to 0.3s.
- Set the x and y axes to 0px.
- For the s-child div:
- Add the "Rotate" animation.
- Uncheck "Set as Initial State" under "Timing".
- Under "Easing", select "ease" and set the duration to 0.3s.
- Set the z-axis rotation to 0 degrees.
By following these steps, you will create an animation that triggers on a mouse click, moves and rotates elements, and returns them to their initial state on a second click.
.png)

.png)


.png)
.png)