


.webp)
.svg)
In our last article/tutorial we've integrated Webflow with Google Sheets using Make.com automations. Today, we're going to cover how to integrate Webflow CMS with Make.com to automatically insert submitted form data into a Webflow collection.
Reasons to Integrate Webflow CMS Collection with Make Automation
- Efficiency and Time Savings
- Automate Repetitive Tasks: Automating the addition and updating of CMS items from form submissions saves significant time. Staff can focus on more critical tasks rather than manual data entry.Instant Updates: New entries are immediately reflected in the CMS, ensuring the website content is always up-to-date.
- Instant Updates: New entries are immediately reflected in the CMS, ensuring the website content is always up-to-date.
- Accuracy and Consistency
- Reduce Human Error: Automation minimizes the risk of errors that often occur with manual data entry, ensuring accurate and consistent information in your CMS.
- Standardized Data: Ensures that all entries follow the same format and structure, improving the quality of your data.
- Enhanced User Experience
- Real-Time Content Updates: Users get access to the latest content instantly, whether it's new blog posts, event listings, or product updates.
- Responsive and Dynamic Website: A constantly updated website keeps users engaged and coming back for fresh content.
- Scalability
- Handle High Volume Submissions: Easily manage large volumes of form submissions without additional manual effort.
- Support Growth: As your business grows, automation can handle increased data input without needing extra resources.
- Streamlined Workflow
- Simplified Processes: Simplifies the process of adding content to the CMS, making it easier for non-technical users to contribute.
- Improved Collaboration: Teams can work more efficiently, with automation taking care of repetitive tasks and allowing for better collaboration
Examples of Useful Integrations of Webflow CMS Collection with Make Automation
- Content Management for Blogs
- Use Case: Automating the addition of new blog posts submitted via a form.
- Benefit: Streamlines the process for guest authors to contribute content. Upon form submission, new blog posts are automatically added to the CMS, saving time and ensuring consistent formatting.
- User Testimonials
- Use Case: Collecting and displaying user testimonials on your website.
- Benefit: Automates the collection and publishing of testimonials submitted by users, ensuring your site has fresh and authentic user feedback without manual updates.
- Event Listings
- Use Case: Managing event details submitted via a form.
- Benefit: Automatically adds event information (date, time, description) to your CMS, ensuring the events section of your site is always current and accurately reflects upcoming events.
- Job Postings
- Use Case: Automatically creating new job listings from submission forms.
- Benefit: Simplifies the process for HR teams by automatically updating the job postings on the website, making sure potential candidates always see the latest openings.
- Product Listings for E-commerce
- Use Case: Adding new products to an online store from vendor submission forms.
- Benefit: Vendors can submit product details directly through a form, and the information is automatically added to the product CMS collection, speeding up the product listing process.
- Real Estate Listings
- Use Case: Automatically adding new property details from agent submissions.
- Benefit: Real estate agencies can quickly display new property listings on their site, ensuring that potential buyers have access to the latest properties without delay.
Example: Automating Job Postings with Webflow CMS and Make
Scenario: Tech Innovations, a medium-sized tech company, regularly posts job openings on their website. The HR managers have been manually adding new job listings to the CMS whenever a department head submits a new job requisition form. This process involves several steps: receiving job details via email, copying and pasting the information into the CMS, and formatting it correctly. This manual process is time-consuming, prone to errors, and often leads to delays in posting new job openings.
Solution: Integrating Webflow CMS with Make.com Automation
Form Creation: Tech Innovations creates a job requisition form on their Webflow website where department heads can enter job details such as title, description, requirements, and location.
Trigger Setup: Make.com is configured to monitor form submissions on the Webflow site. Whenever a form is submitted, it triggers the automation process.
Automated CMS Update: When a department head submits the form, Make automatically creates a new job listing in the Webflow CMS using the provided details. The form fields (e.g., job title, description, requirements) are mapped to the corresponding CMS fields to ensure accurate and consistent formatting.
Immediate Publication: The job listing is immediately published on Tech Innovations’ career page, making it accessible to potential candidates without delay.
By integrating Webflow CMS with Make automation, Tech Innovations has solved the problem of manual job posting management. This integration has not only improved operational efficiency but also enhanced the overall effectiveness of their recruitment process, ensuring that job listings are accurate, up-to-date, and promptly available to potential candidates.
Step-by-Step Guide to Integration Make.com with Webflow CMS collection
Now comes the practical part of the tutorial. Let's delve into creating this entire process from scratch in 9 steps.
1. Set Up Your Webflow Form
- Create the Form: Ensure your form in Webflow includes fields for all the details you want to capture (e.g., Name, Email, Content for the CMS post).
Note: Make sure that all of the form fields have a proper field name. If you're creating "company name" field, click it and go inside the field settings, inside of the text field settings set the name to "company_name". Avoid using generic names such as "field 1”, or “field 2”. - Publish Your Webflow Site: Make sure your Webflow site is published and your form is functioning properly.
2. Set Up Your Webflow CMS
- Create a CMS Collection: In Webflow, create a CMS Collection that will store the form submissions. Ensure the collection has fields corresponding to the form fields (e.g., Name, Email, Content).
- Publish Your Changes: Ensure your CMS Collection is published and ready to accept new items.
3. Sign Up/Log In to Make
- Log in to your Make account and from your Make dashboard, click on "Create a new scenario".
4. Set Up the Trigger
- Choose a Trigger Module: Search for and select the "Webflow" module. Then, select the "Watch events" module.

- Create a New Webhook and make sure you name it appropriately, for example, "Form submission event".
Note: A webhook is just a way for apps to communicate instantly without needing to constantly check for updates.
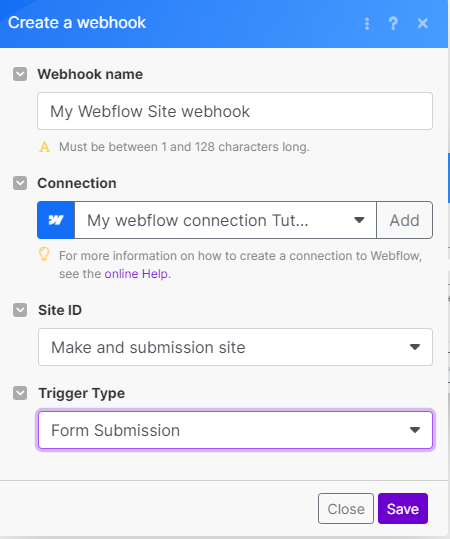
- Connect Your Webflow Account - Authenticate your Webflow account and grant Make access.
- Configure Trigger by selecting your Webflow site and choose the specific form you want to monitor for submissions; in this tutorial, we select "Form submission".
5. Make a Test Submission
- Run the Scenario Once: Click the "Run once" button at the bottom left of the Make interface.
- Submit the Form: Go to your Webflow site, fill in the required details on your form, and click the "Submit" button.
- Verify Data Capture: After submitting the form, Make will capture the necessary details, allowing it to recognize the data needed for your CMS collection.
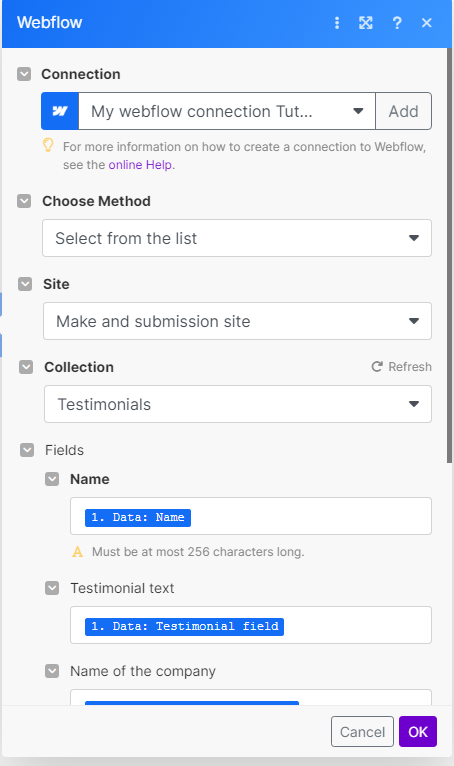
6. Add an Action to Create a CMS Item
- Add a Module: Click the "+" icon to add a new module.
- Choose a Module: Search for and select the "Webflow" module again.
- Set Up Action: Choose the "Create an Item" action.
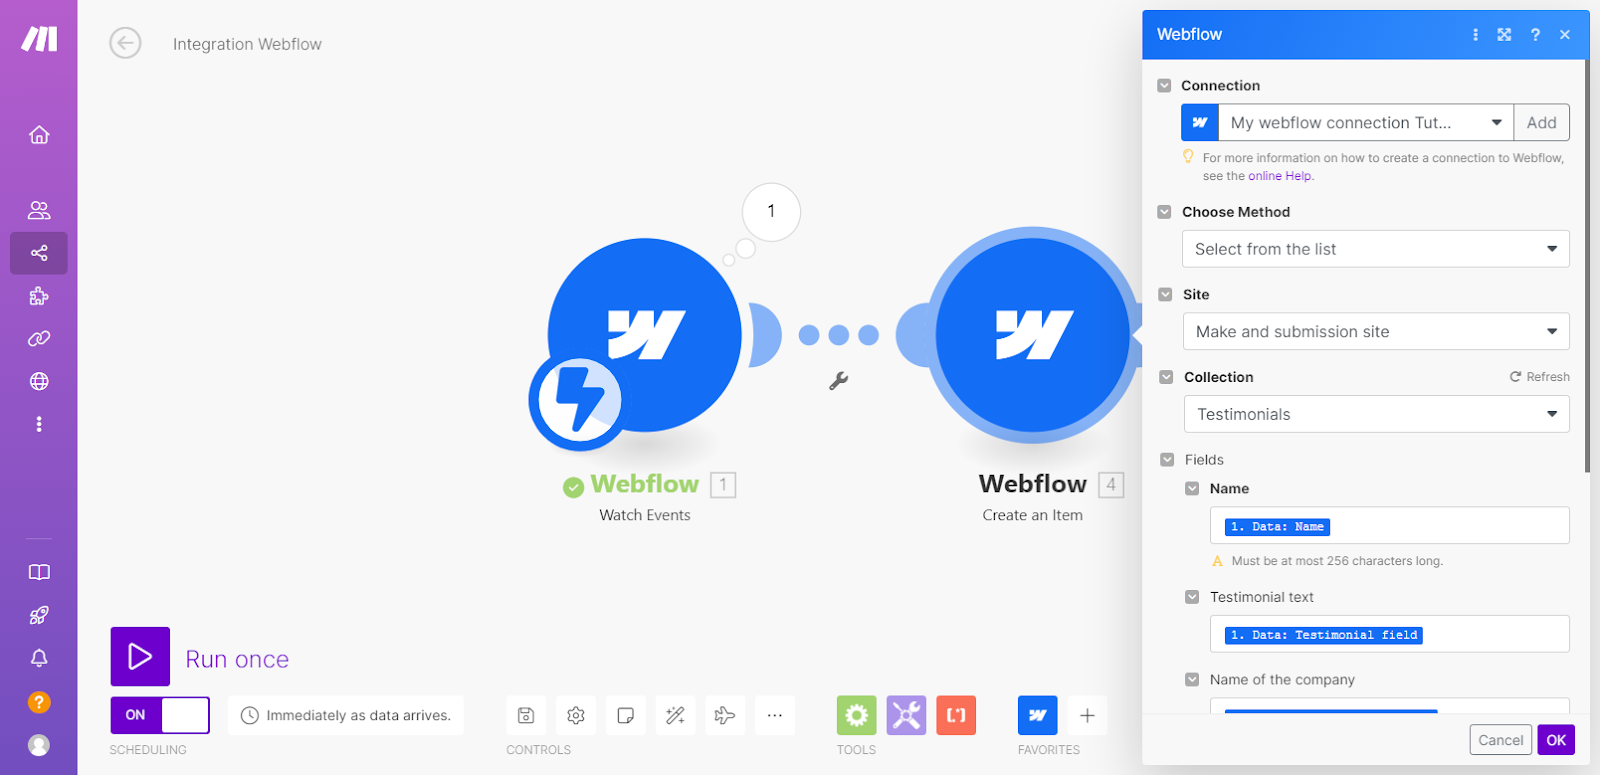
- Configure Action:
- Site: Select your Webflow site
- Collection: Select the CMS Collection where you want to add new items.
- Map Fields: Map the form fields (from the trigger step) to the corresponding CMS fields.
7. Test the Scenario
- Run Once: Click on the "Run Once" button to test the scenario.
- Submit a Test Form: Go to your Webflow site and submit the form.
- Check the Output: Ensure that a new CMS item is created in your Webflow CMS with the details from the form submission.

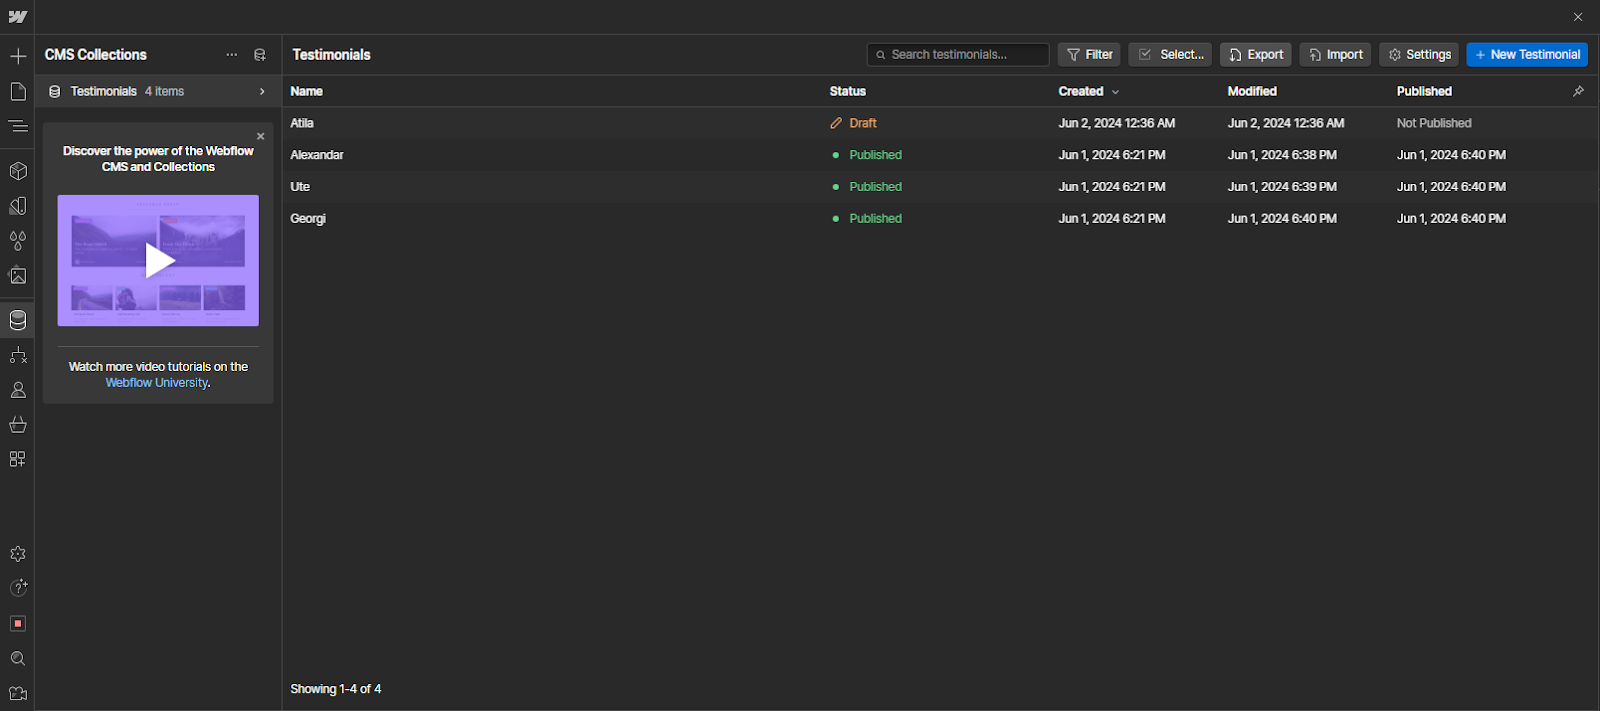
Note: When you get something new from Make Automatisation, it'll be in your CMS as a draft. Review it and determine whether to publish it.
8. Schedule and Activate the Scenario
- Schedule: Set the scenario to run automatically based on your preferred schedule (e.g., every 15 minutes).
- Activate: Turn on the scenario to start the automation.
9. Monitor and Maintain
- Monitor Performance: Regularly check the scenario’s performance and logs to ensure it continues to function as expected.
- Update as Needed: If your workflow requirements change, you can modify the scenario or add new actions as necessary.
Conclusion
Integrating Webflow CMS with Make.com automation significantly enhances efficiency by automating the addition and updating of CMS items from form submissions. This eliminates manual data entry, reduces errors, and ensures consistent and accurate data. Real-time updates keep the website fresh and engaging, improving user experience. The scalable solution supports business growth by handling high volumes of submissions effortlessly. This guide demonstrates the step-by-step process to achieve this integration, making content management simpler and more effective.
.png)

.png)


.png)
.png)