


.svg)
What is a Make Filter?
In the context of Make a filter is a feature that allows you to define specific criteria that data must meet in order to proceed to the next module in an automation scenario. Filters are used to control the flow of data between modules based on conditions you set. This means that only data that matches these conditions will be processed further, while data that does not match will be ignored.
How Filters Work?
- Condition Setup: Filters are set up by defining one or more conditions that the data must satisfy. These conditions can be based on values from previous modules, such as form inputs, timestamps, text strings, numbers, or other data points.
- Logical Operators: You can use logical operators like equals, not equals, greater than, less than, contains, and others to define the conditions.
- Multiple Conditions: Filters can include multiple conditions combined with AND/OR logic to create complex rules.
Why are filters used?
- Data Validation
- Ensure Quality: Filters ensure that only data meeting specific criteria is processed, which helps maintain data quality and integrity.
- Error Prevention: By filtering out unwanted or incorrect data, you can prevent errors and issues further down the automation chain.
- Efficiency
- Optimize Resources: Filters prevent unnecessary processing of irrelevant or invalid data, saving computational resources and time.
- Focused Processing: By processing only relevant data, filters ensure that automation workflows run more efficiently and effectively.
- Conditional Workflows
- Dynamic Logic: Filters allow for the creation of dynamic workflows where different actions are taken based on the data. For example, sending different email responses based on the user's input.
- Custom Paths: Filters can direct data through different paths in your scenario based on specific conditions, enabling more customized and flexible automation.
- Simplification
- Streamline Processes: Filters help streamline complex scenarios by breaking them into simpler, condition-based steps.
- Clarity: Using filters can make your automation scenarios clearer and easier to manage by defining exactly which data should proceed at each step.
Example Use Case: Automating Customer Feedback
Scenario: A company uses a Webflow form to collect customer feedback. The form submissions include a rating from 1 to 5, with 5 being very satisfied and 1 being very dissatisfied. The company wants to automate their response process, sending a thank-you email for high ratings and a follow-up email for low ratings.
Solution Using Make Filters
- Form Submission: The Webflow form captures customer feedback and sends it to Make.
- Filter Setup:
- High Ratings: A filter is set up to check if the rating is 4 or 5. If the condition is met, the data proceeds to the module that sends a thank-you email.
- Low Ratings: Another filter checks if the rating is 1, 2, or 3. If this condition is met, the data proceeds to a different module that sends a follow-up email seeking further details on the customer's dissatisfaction.
- Efficiency and Customization: The company ensures that only relevant feedback is processed by each module, optimizing resources and ensuring appropriate responses. By using filters, the workflow is tailored to respond differently based on the feedback rating, improving customer engagement and satisfaction.
In summary, Make filters are a powerful tool for controlling data flow in automation scenarios, ensuring data quality, optimizing efficiency, enabling conditional workflows, and simplifying complex processes. By setting specific criteria, you can direct data through the most appropriate paths, enhancing the effectiveness and reliability of your automated systems.
Steps to Set Up a Filter for Your Webflow Form Automation
Now comes the practical part of the tutorial. Let's delve into creating this entire process from scratch in 4 steps.
- Open the Filter Setup - Click on the tool icon and select "Set up a filter."

- Name the Filter - Give the filter a label. For example, name it "Filter Testimonial Form".
- Configure the Condition - Set up the condition based on the desired criteria. In this case, ensure the condition checks for the presence of a testimonial name.
- Match the Form Name - Ensure that the form name matches the name configured in the form settings for the Submission form in Webflow. This ensures the filter accurately identifies the correct form submission.
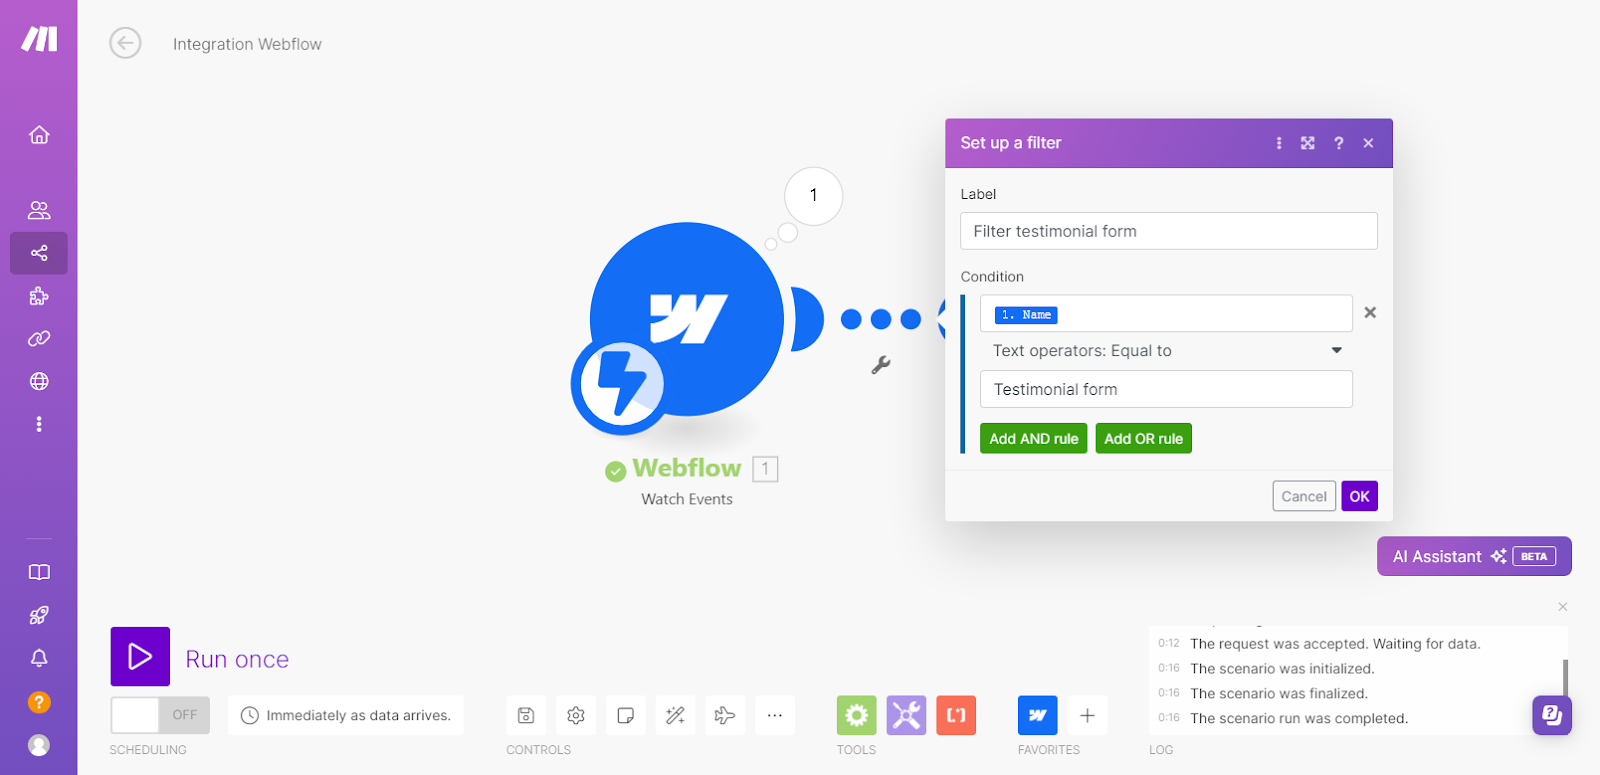
By following these steps, you can ensure that your automation only triggers when the specific Submission form is filled out, preventing unintended actions from occurring with other forms.
Bonus Tips and Best Practices
Error Handling
Set Up Error Notifications: Configure error notifications to alert you if a scenario fails.
Review Logs: Regularly review scenario logs to identify and fix issues promptly.
Optimizing Workflows
Simplify: Keep workflows as simple as possible to reduce the risk of errors.
Test Regularly: Test scenarios regularly to ensure they function as expected.
Security Considerations
Secure Connections: Use secure connections (HTTPS) to protect data.
Handle Sensitive Data Carefully: Ensure sensitive data is handled securely and complies with relevant regulations.
Conclusion
Integrating Webflow with Make.com opens up a world of possibilities for automating tasks and enhancing your website’s functionality. By following this guide, you can create efficient workflows that save time and reduce manual work. Start exploring the integration today and see how it can transform your web management processes.
If you would like to learn how to integrate Make.com with Google sheets, here is tutorial.
.png)

.png)


.png)
.png)