


.svg)
Every business needs a way to generate leads. If you’re a SaaS company, the goal is to have people sign up for the product, while an e-commerce website aims to have people complete the checkout form or sign up for newsletters. Nonetheless, managing leads to get your business on a higher level is very important. If you were to check your phone right now, you've probably received an email notifying you of a discount on that web design course that you checked on a few days ago or new sneakers at a nearby store, and that's exactly what effective leads management looks like.
This is just one example of how you can enhance your business performance, and Hubspot is a great tool to use alongside Webflow to effortlessly manage customer’s data. This text will focus on explaining what Hubspot is, its uses, and how to implement it in your Webflow project.
What is HubSpot?
HubSpot is a leading customer relationship management (CRM) platform that offers a suite of tools designed to help businesses grow by optimizing their marketing, sales, customer service, and content management processes. Founded in 2006, HubSpot has become a go-to solution for businesses looking to streamline their operations and improve customer engagement.
At its core, HubSpot's CRM system is designed to centralize customer data, making it easier for businesses to manage and analyze their interactions with clients and prospects. This centralization helps teams stay organized and ensures that all customer-facing employees have access to the same up-to-date information, enhancing collaboration and communication.
HubSpot's marketing hub is particularly popular for its comprehensive set of tools that facilitate inbound marketing strategies. It includes features like email marketing, social media management, SEO optimization, and content creation, allowing businesses to attract, engage, and delight customers effectively. With HubSpot's marketing automation capabilities, businesses can create targeted campaigns that nurture leads through personalized email sequences and automated workflows.
Why should you implement HubSpot on your website?
Implementing HubSpot on your website can be a game-changer for your business, providing a multitude of benefits that streamline operations, enhance customer engagement, and drive growth. Here’s why you should consider integrating HubSpot into your website:
1. Centralized Customer Data: HubSpot's CRM centralizes all customer information, making it easily accessible to your team. This ensures that every interaction with a customer is informed and personalized, enhancing customer satisfaction and loyalty.
2. Enhanced Marketing Efforts: HubSpot’s marketing hub offers a comprehensive suite of tools for inbound marketing. From email marketing and social media management to SEO optimization and content creation, these tools help attract, engage, and convert leads more effectively. Marketing automation features allow for the creation of personalized campaigns that nurture leads through targeted email sequences and workflows.
3. Streamlined Sales Processes: HubSpot’s sales hub provides tools that make the sales process more efficient. Features like email tracking, meeting scheduling, and pipeline management help sales teams close deals faster and more effectively. The integration with the CRM ensures that sales representatives have access to valuable customer insights, enabling more personalized and informed interactions.
4. Automation and Efficiency: HubSpot’s automation capabilities across marketing, sales, and customer service free up your team from repetitive tasks, allowing them to focus on strategic initiatives. This not only increases efficiency but also ensures that no lead or customer inquiry falls through the cracks.
5. Data-Driven Decisions: With HubSpot’s robust analytics and reporting tools, you can gain deep insights into your marketing, sales, and service efforts. These insights enable you to make data-driven decisions that optimize performance and drive growth.
Installing and Authorizing the HubSpot App in Webflow
Creating a HubSpot Account
Before integrating HubSpot with Webflow, one must first establish a HubSpot account. Signing up is straightforward and can be initiated directly from the HubSpot website. Users can start with a free account, which can be upgraded as business needs grow. This account will be essential for managing the settings and integrations within the Webflow environment.
Adding the HubSpot App
To add the HubSpot App to a Webflow site, navigate to the "Apps" tab within the Webflow Designer interface. Here, users can locate the HubSpot App and proceed by clicking the install button. This action initiates the installation process, integrating the HubSpot marketing automation capabilities into the selected Webflow site.
1. Open the Webflow Designer and select the "Apps" tab.
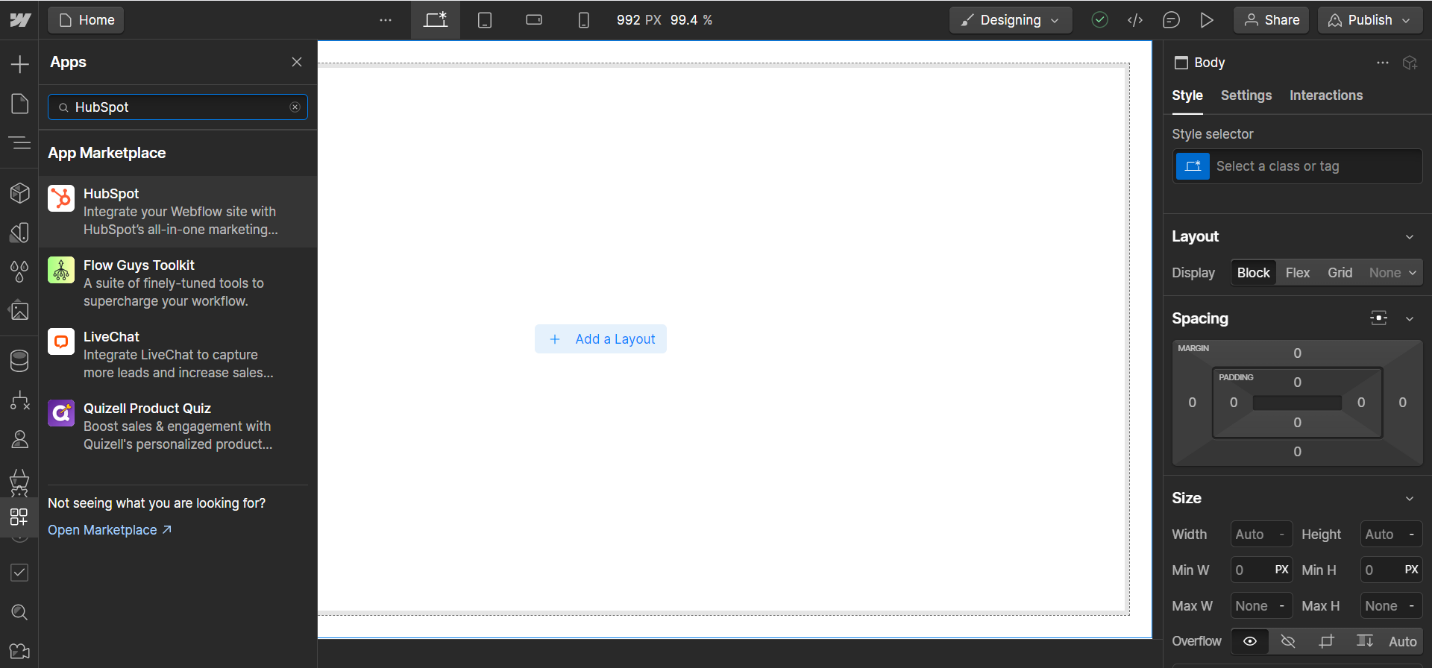
2. Find and select the HubSpot App.
3. Click on the install button to add the app to your Webflow site.
Authorizing the Integration
Once the HubSpot App is installed, the next critical step is to authorize the integration. This process connects the Webflow site with the HubSpot account, ensuring that data flows seamlessly between the two platforms. Authorization is achieved through a series of steps where the user reviews and accepts the necessary permissions.
1. Go to the HubSpot App detail page in Webflow.
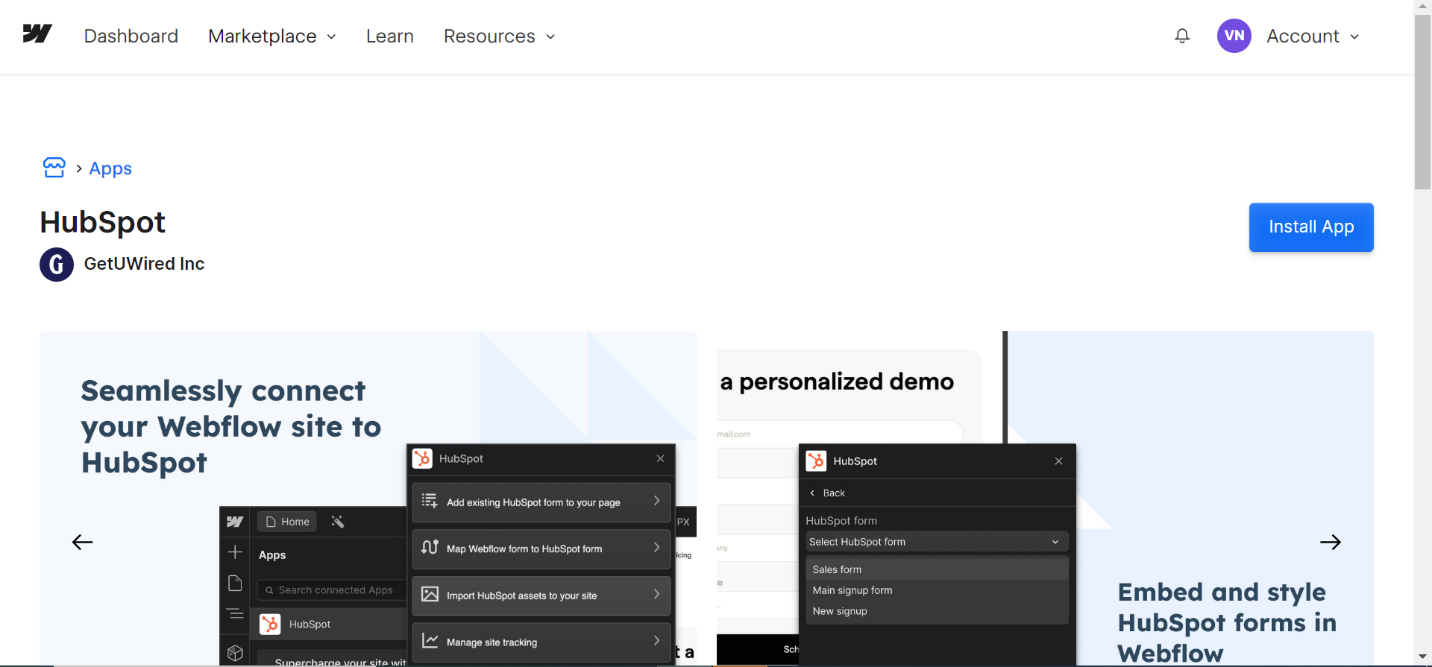
2. Click Install App.
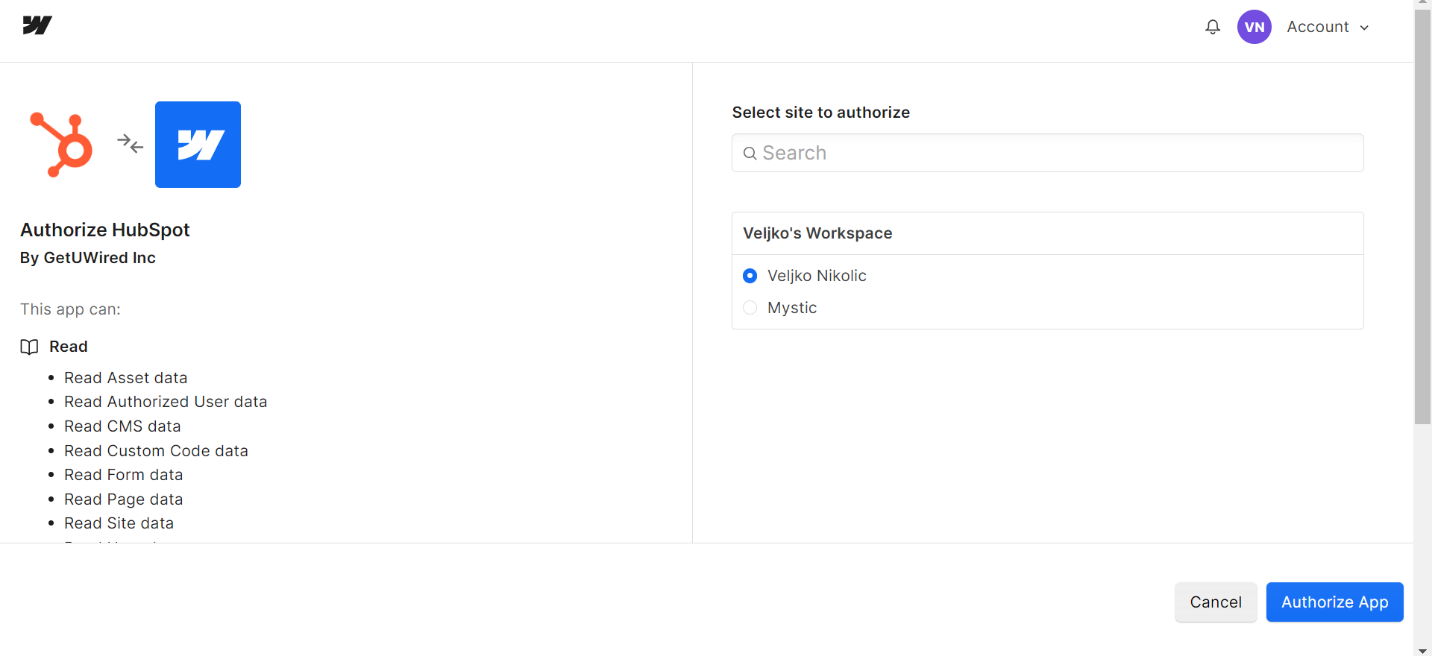
3. Select the Webflow site to connect with HubSpot.
4. Review and accept the requested scopes.
5. Click the Authorize App to grant permissions.
6. Choose the relevant HubSpot account and click Choose account.

7. Finalize the connection by clicking Connect App. This action will redirect the user to their Webflow dashboard, confirming that the HubSpot App is now linked and operational.
It is important to note that the HubSpot App cannot be connected to an entire Workspace simultaneously. Users must select individual sites within their Webflow account for integration. If this is a first-time installation and the user is not a Super Admin, they must ensure they have the App Marketplace permission enabled in their HubSpot account settings.
By following these steps, businesses can effectively integrate HubSpot's powerful marketing tools with their Webflow sites, enhancing their digital marketing efforts and streamlining their workflow for better efficiency and increased productivity.
Embedding and Styling HubSpot Forms in Webflow
Selecting HubSpot Forms
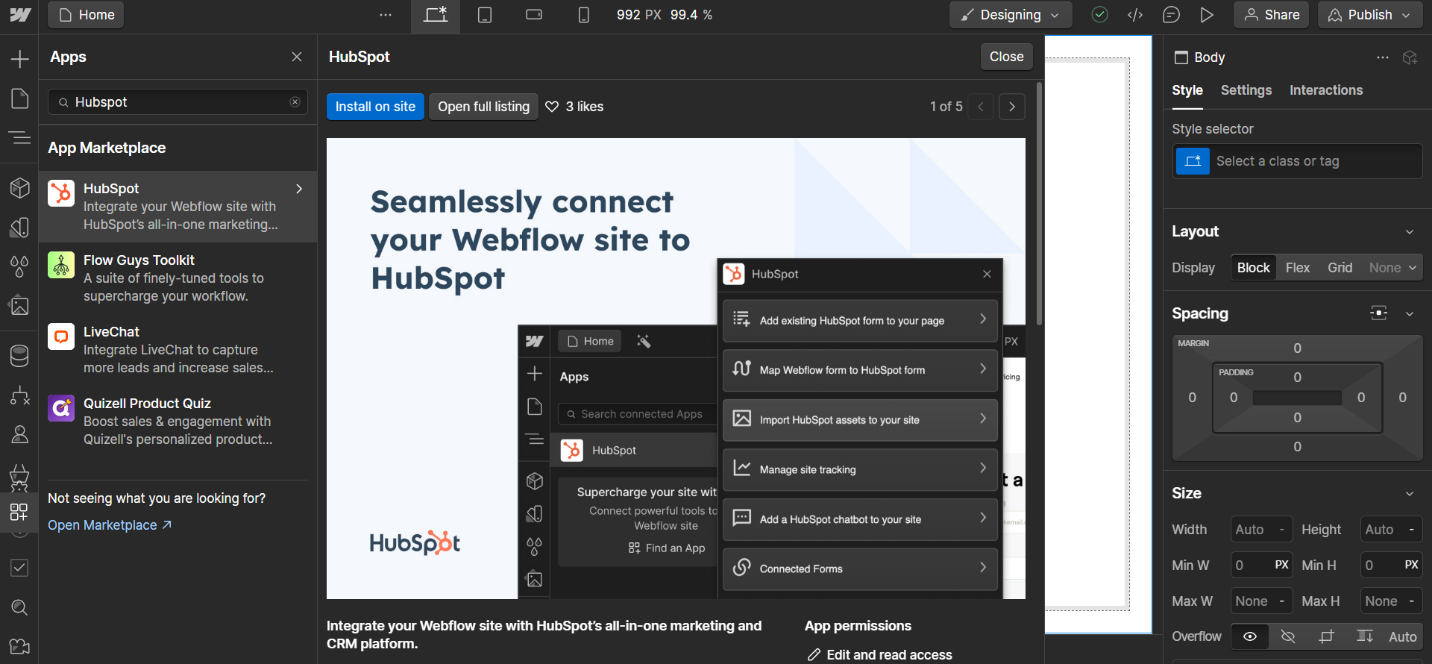
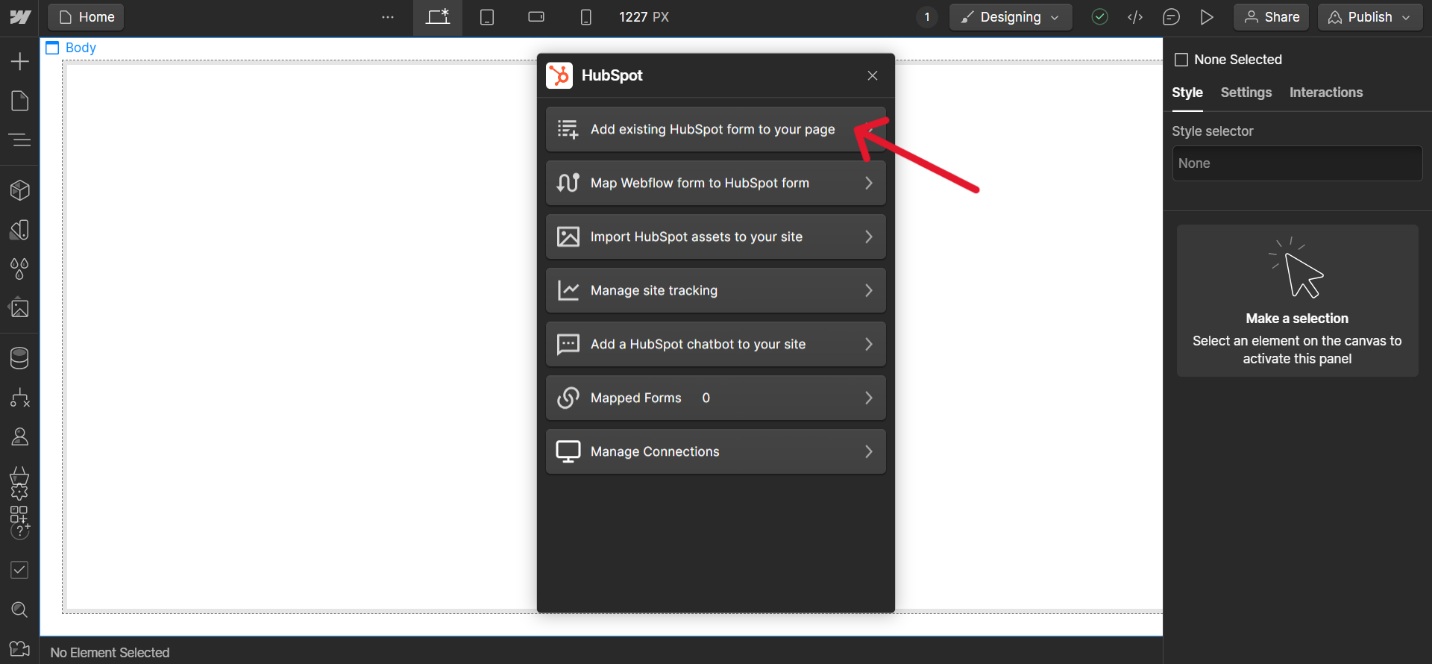
To begin embedding a HubSpot form into a Webflow site, one must first launch the HubSpot App within the Webflow Designer interface. Following this, the user should click on Add existing HubSpot form to your page. This action allows the user to select the specific element on the Designer canvas where the form will be embedded. It is crucial to choose a HubSpot form that is supported for embedding; unsupported forms, such as those with reCAPTCHA fields, may not function correctly due to the limitations of the HubSpot developer platform.
Previewing and Styling Forms
Once the appropriate form is selected, users have the option to either inherit the styling from HubSpot or to use an unstyled version of the form. This choice is significant as it affects the visual integration of the form with the site’s existing design. After selecting the styling preference, clicking Add Form to Page will embed the form onto the Webflow page.
For further customization, users can style the form directly in the Webflow Designer. This flexibility allows for a seamless aesthetic match with the rest of the site, enhancing the overall user experience. If a form is unable to be embedded directly due to compatibility issues, an alternative method involves using the form’s Share URL. By pasting this URL into the HubSpot Share URL field in the App, the form can be embedded as an iframe. Although this method does not support direct styling within Webflow, any changes made to the form on the HubSpot side will automatically update on the Webflow site.
In summary, embedding and styling HubSpot forms within Webflow involves selecting a supported form, choosing the desired styling option, and embedding the form onto the page. For forms that face compatibility issues, embedding via
an iframe serves as a viable alternative, ensuring that the integration remains functional and up-to-date with any modifications made in HubSpot.
Connecting Webflow Forms to HubSpot
Mapping Webflow Forms to HubSpot
To effectively utilize Webflow forms within the HubSpot ecosystem, it is crucial to establish a direct connection between the form fields in Webflow and the corresponding fields in HubSpot. This mapping ensures that when information is submitted through a Webflow form, it is automatically populated into the appropriate fields in HubSpot, facilitating seamless data integration and management.
1. Launch the HubSpot App
2. Click Map Webflow form to HubSpot form
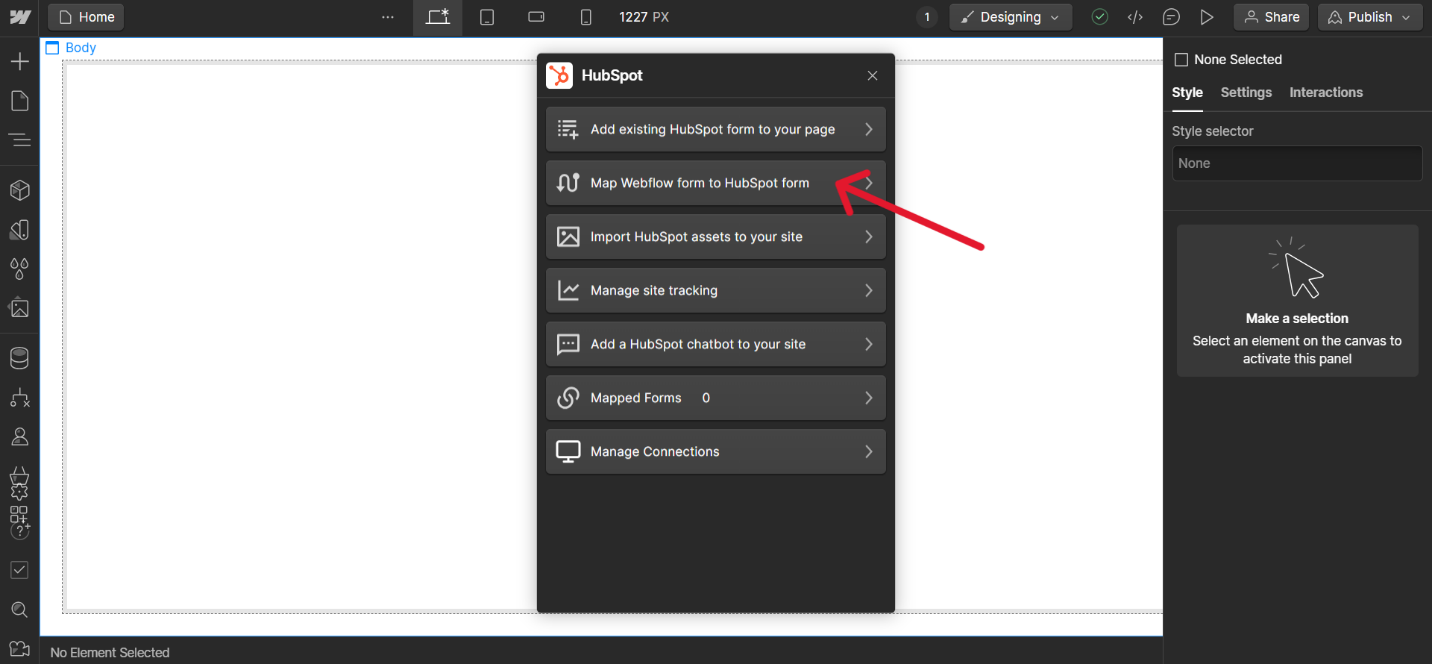
3. Select the form you wish to map from on the Webflow canvas

4. Check to ensure the form you selected has form labels present
5. Select the matching HubSpot form field for each corresponding Webflow form field

6. Click Save
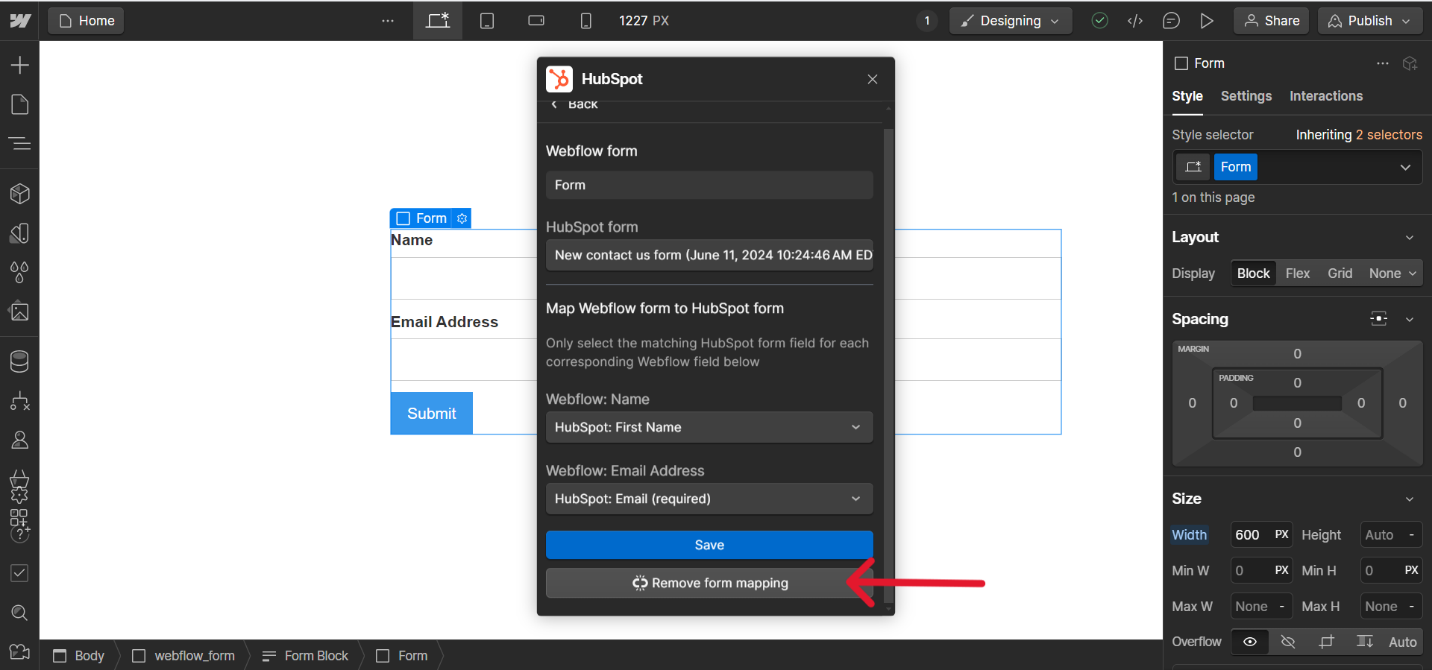
Managing Connected Forms
Once your Webflow forms are connected to HubSpot, ongoing management and updates are necessary to maintain the integration's effectiveness.
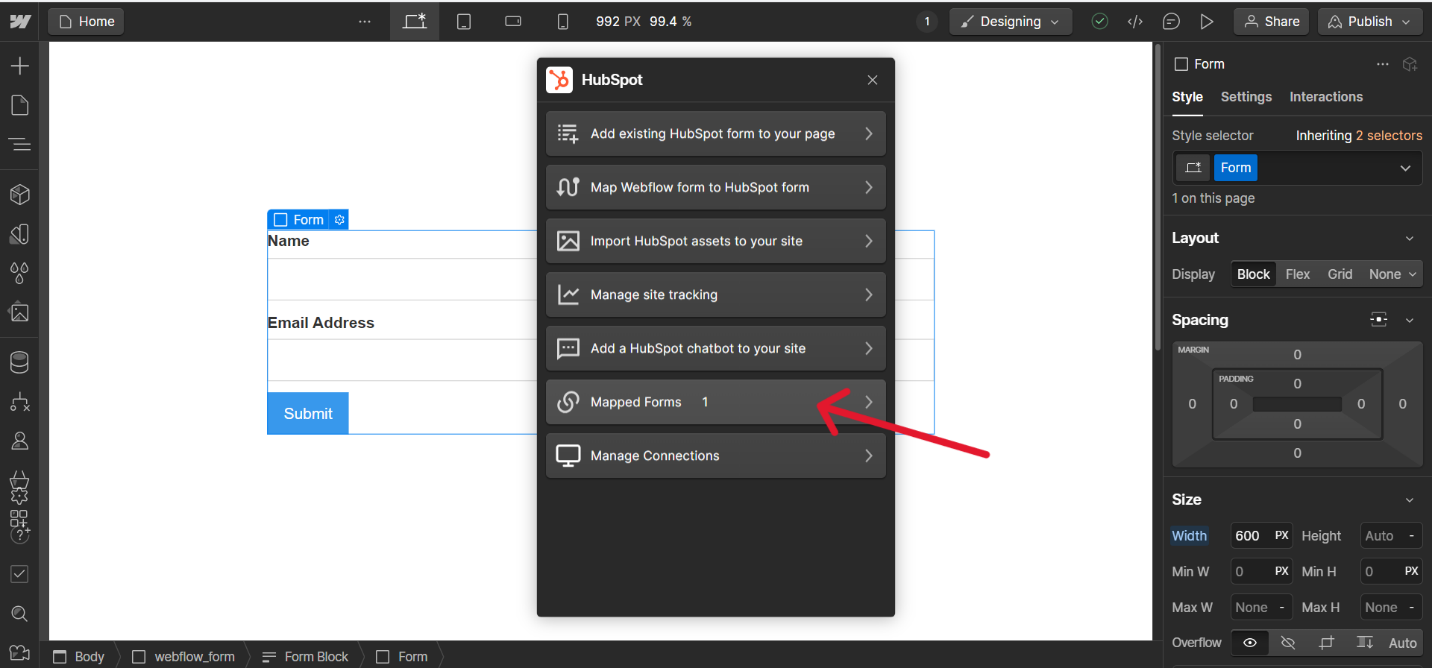
1. Access Connected Forms: In your Webflow workspace, launch the HubSpot App and select Mapped forms. This section will display all forms that have been linked to HubSpot, allowing for easy access and management.
2. Update Form Connections: If changes are needed, select the form that you want to make changes on, and when you finish everything just click save.

3. Remove Form Integrations: Should you need to delete a form integration, on the bottom you’ll see a button that says Remove form mapping, just click it and the form won’t be connected to HubSpot anymore.
By following these steps, businesses can ensure that their Webflow forms are effectively integrated with Hubspot, enhancing their ability to capture and manage customer data efficiently. This integration not only streamlines workflows but also leverages the robust capabilities of both platforms to improve overall marketing and sales efforts.
Adding HubSpot Assets and Chat Bots
Integrating HubSpot assets and chatbots into a Webflow site can significantly enhance its functionality and user engagement. This section provides a step-by-step guide on how to achieve this integration, focusing on importing HubSpot assets and embedding chatbots into your Webflow site.
Importing HubSpot Assets
To enrich your Webflow site with HubSpot's marketing assets, follow these steps:
1. Launch the HubSpot App within your Webflow project to begin the process.
2. Select Import HubSpot assets to your site to access your HubSpot account's assets directly from Webflow.

3. Search and select the asset you wish to import. This can range from images, and videos, to other marketing materials approved for your campaign.
4. Choose the element on your Webflow canvas where you'd like to incorporate the selected asset.
5. Click Add to page to finalize the import process.
It's important to note that assets imported from HubSpot using the App will not appear in the Webflow Assets panel. This means that while they are accessible and usable within your site, they are managed through the HubSpot App interface rather than Webflow's asset management system.
Embedding Chat Bots
Adding a HubSpot chatbot to your Webflow site can provide a dynamic way to engage visitors and capture leads. To embed a HubSpot chatbot, follow these instructions:
1. Within the HubSpot App in Webflow, click on Add a HubSpot chatbot to your site.
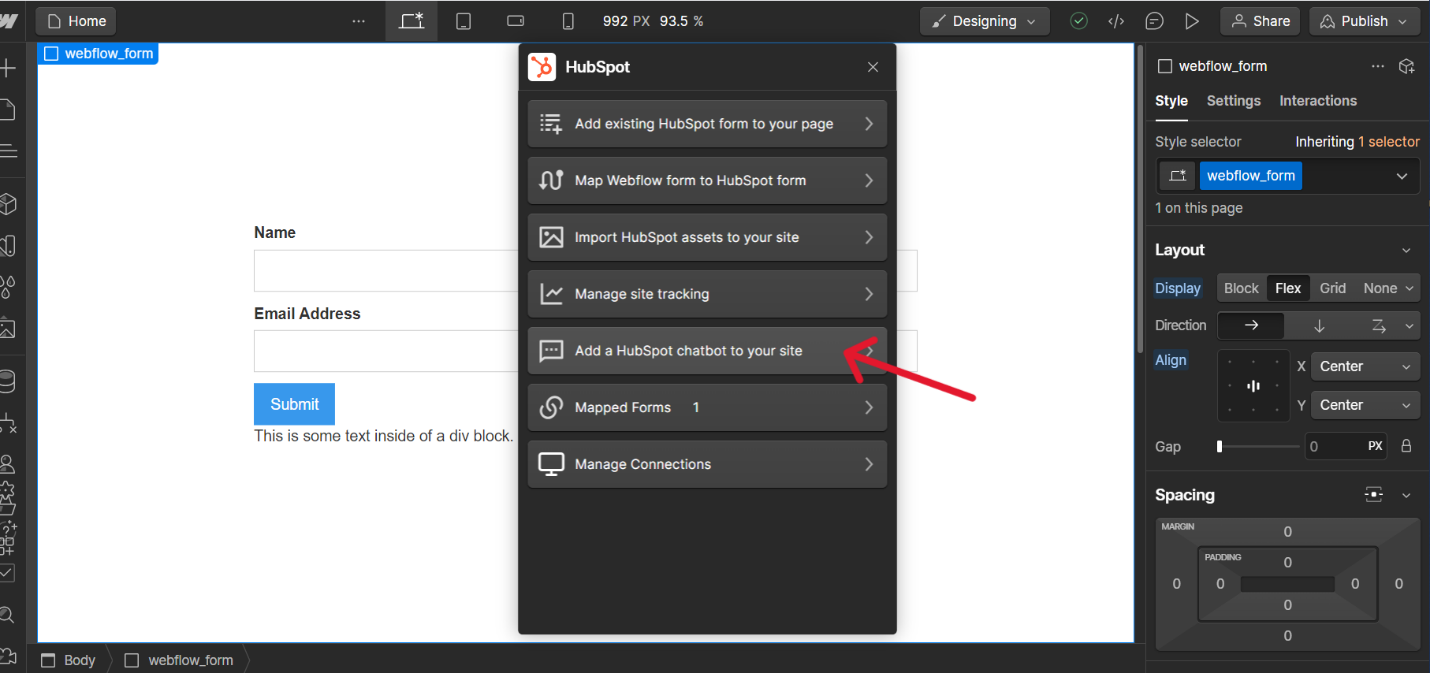
2. Proceed to View HubSpot chatbot library to select from your existing library of chatbots or to modify them according to your site's requirements.
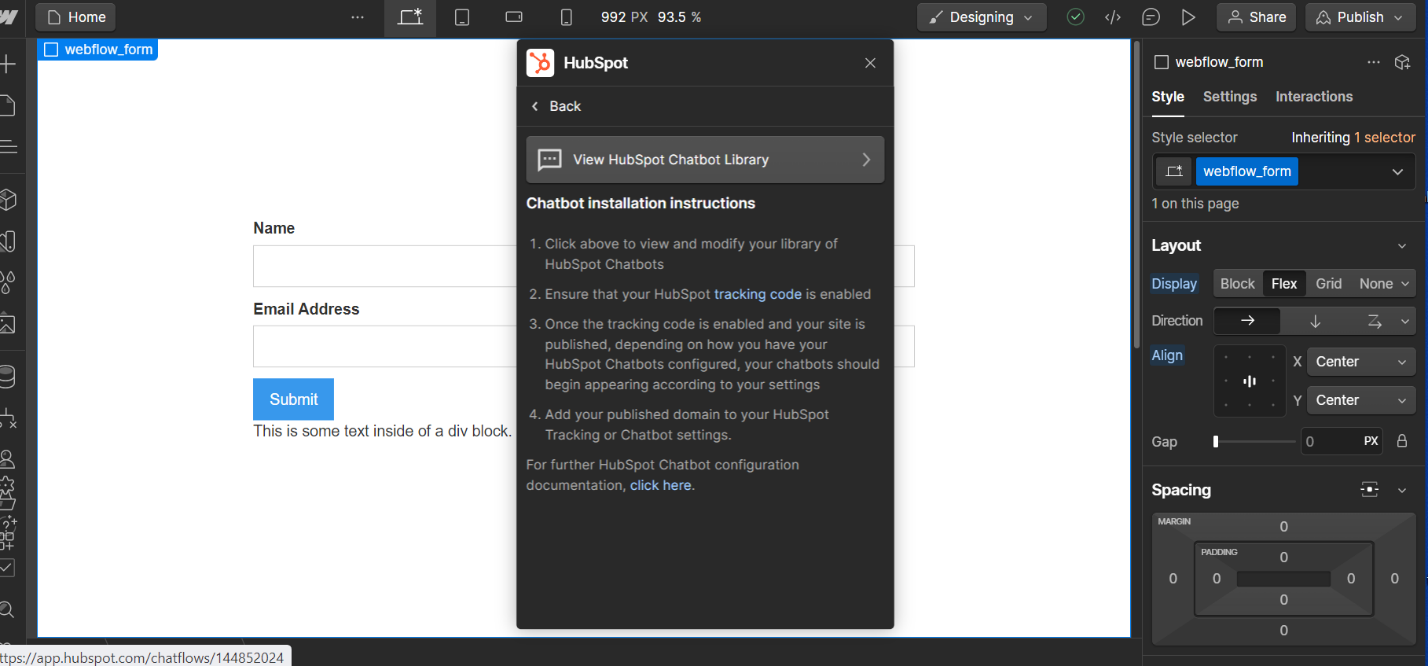
3. Ensure that the HubSpot tracking code is enabled on your site for the chatbot to function correctly.
4. After configuring your chatbot settings, publish your site to activate the chatbot.
For those interested in creating an AI chatbot rather than a live chat feature, the process involves configuring the bot settings in HubSpot and then embedding it into your Webflow site using custom code. This custom code is provided by
HubSpot during the chatbot setup process and needs to be installed on your site's main page or as specified.
Additionally, if integrating a chatbot from another platform such as Drift, it's possible to configure the chatbot to send information to HubSpot at the end of a chat session. This requires setting up the integration within the third-party
chatbot platform to ensure data is correctly forwarded to your HubSpot CRM.
Enabling HubSpot Site Tracking
To effectively monitor and analyze website traffic, enabling HubSpot site tracking on a Webflow site is essential. This process involves adding a unique HubSpot tracking code to the Webflow project, which allows HubSpot to gather data on site visitors and their interactions. The following steps guide users through the process of adding this tracking code and verifying its functionality to ensure accurate data collection.
Managing site tracking
1. Launch the HubSpot App
2. Click Manage site Tracking
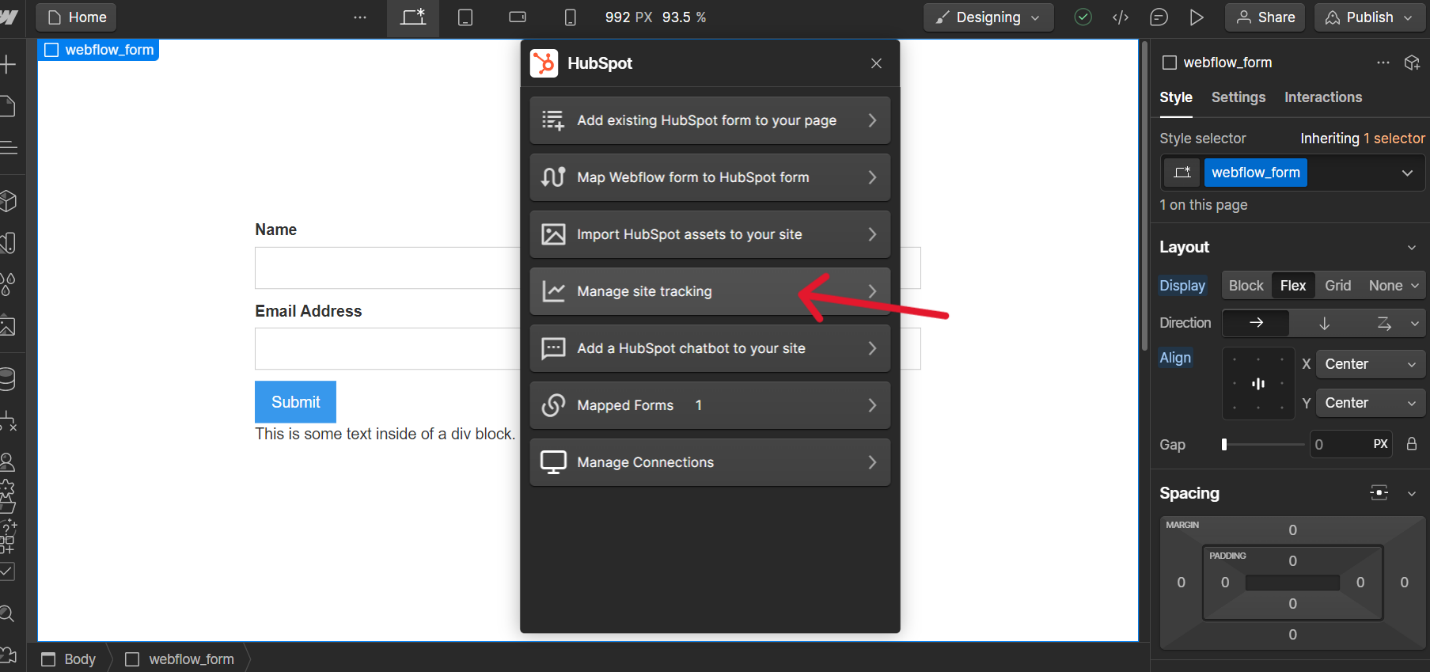
3. Toggle Enable HubSpot site tracking code to On
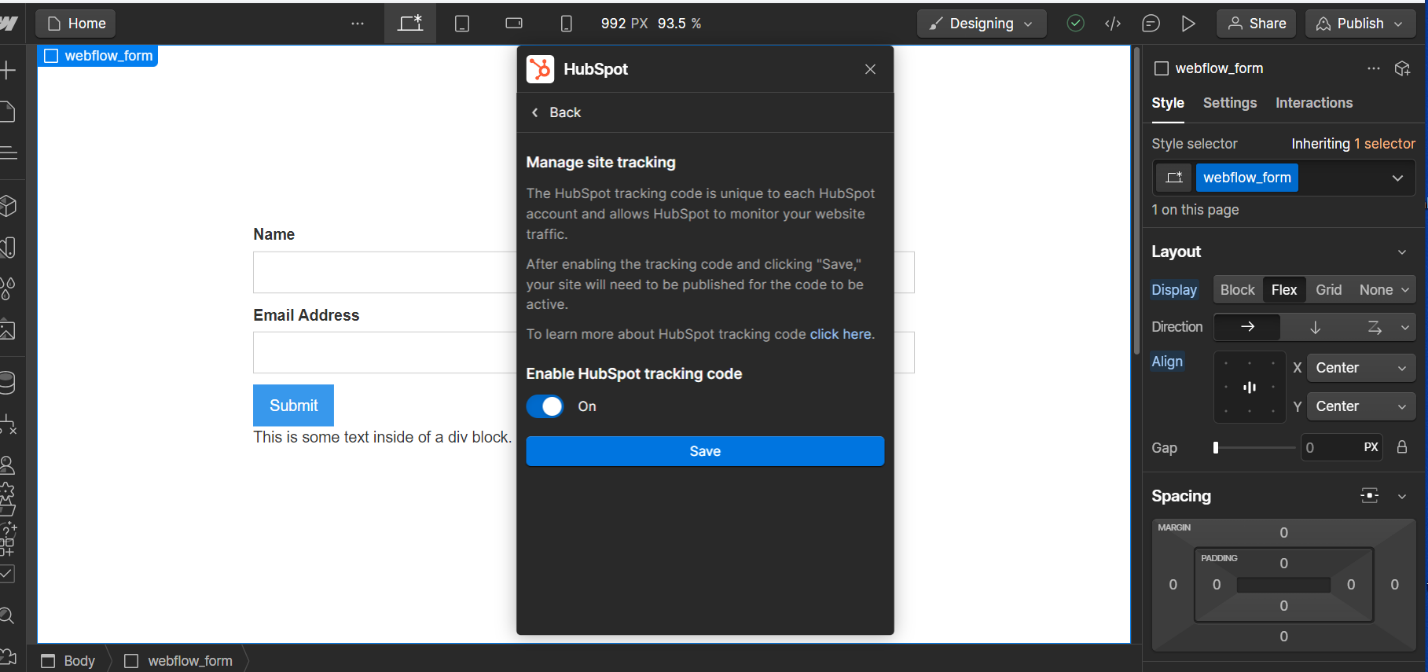
4. Click Save
Verifying Tracking Functionality
To ensure that the HubSpot site tracking is active and functioning correctly, users should perform the following steps:
1. Publish the Site: After adding the tracking code, the Webflow site must be published for the changes to take effect. This action activates the HubSpot tracking code across the site.
2. Check HubSpot for Data: Users can verify the tracking functionality by checking their HubSpot account for incoming data. This involves logging into HubSpot, navigating to the 'Reports' section, and then selecting 'Analytics Tools'. Here, one can view the website traffic data being collected, indicating that the tracking code is operational.
3. Troubleshoot if Necessary: If data does not appear in HubSpot as expected, users should revisit the steps to ensure the tracking code was correctly copied and pasted into the Webflow project. Additionally, confirming that the site has been published after adding the code is crucial for tracking to be active.
By following these steps, businesses can enable HubSpot site tracking on their Webflow site, allowing for detailed analysis of website traffic and user interactions. This integration is vital for optimizing digital marketing strategies and improving overall website performance.
Conclusion
Embarking on the journey to meld the dynamic design capabilities of Webflow with the comprehensive marketing tools HubSpot offers presents an innovative avenue for businesses keen on enhancing their online presence. The expedition through integrating Webflow forms with HubSpot, embedding and customizing HubSpot forms within Webflow, and ensuring a seamless data flow between Webflow forms and HubSpot, underscores the essential strategies for elevating digital marketing efforts. This convergence not only streamlines operational efficiencies but also amplifies lead generation and engagement, cementing the foundation for a robust online ecosystem.
The critical insights detailed in the article pave the way for businesses to leverage the synergistic potential of Webflow and HubSpot, guiding them toward achieving an optimized online user experience and fortified lead-capturing capabilities. As the digital landscape continues to evolve, the significance of such integration cannot be overstated, beckoning further exploration and adaptation in the realms of web design and digital marketing. Thus, companies are encouraged to delve into this integration, harnessing the full spectrum of advantages it offers, thereby driving forward their marketing endeavors with precision and innovation.
.png)

.png)


.png)
.png)