


.svg)
The combination of Webflow and Memberstack offers incredible possibilities for creating websites with membership functionalities, payments, and many other advanced options. In this detailed guide, we will explain all aspects of integrating Memberstack into Webflow, including implementation, adding attributes, creating plans, managing access, and more.
Implementing Memberstack in Webflow
Step 1: Downloading the Memberstack App in Webflow
The first step in integrating Memberstack with Webflow is downloading the Memberstack app. Go to the Webflow Marketplace, find the Memberstack app, and install it in your project or workspace. With the Memberstack app, you can add custom attributes to site elements like signup forms directly from Webflow without having to go to Memberstack to copy attributes, saving you a lot of time.

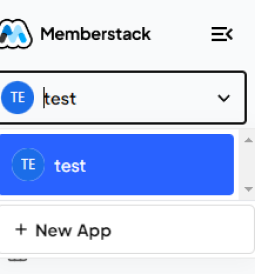
Step 2: Creating an Account on Memberstack
Visit the Memberstack website, click on "Get Started," and create an account. After registering, create a new project. Memberstack will generate an API key that you will need for the integration.
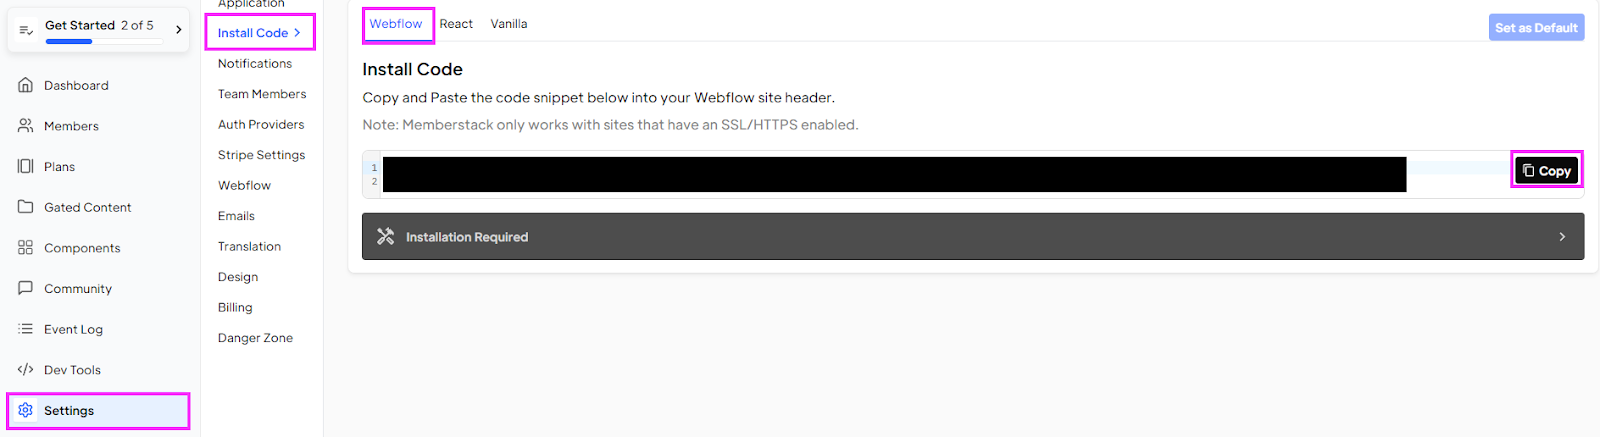
Step 3: Connecting Memberstack and Webflow
Open Memberstack, go to "Settings," then "Install Code." Among the options (Webflow, React, and Vanilla), select the Webflow tab and copy the installation code specifically for Webflow. Then return to your Webflow site, open "Project Settings," click on the "Custom Code" tab, and paste the code in the "Head Code" section. It is crucial to paste the code in the "Head" section (not the "Body") to ensure it loads immediately when the website starts.

Adding Memberstack Attributes to Webflow Elements
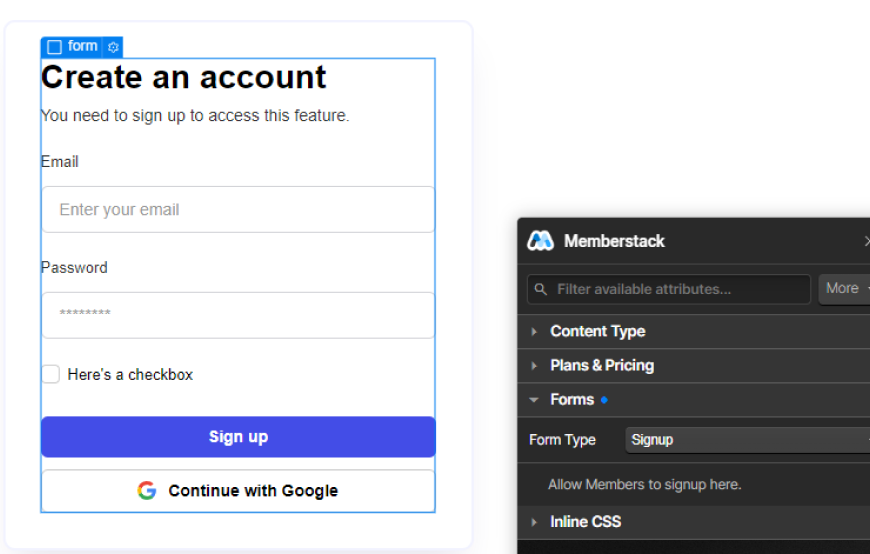
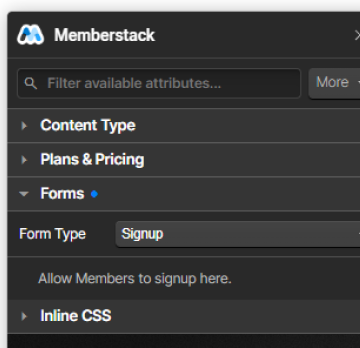
Step 4: Creating Signup and Login Forms
Create a signup and login form in Webflow, find the Memberstack app, and launch it.
For the signup form:
- Click on the form, open the "Form" dropdown menu in the app, and set "Form Type" to "Signup."
- Click on the email input field, open "Member Data (Input)," and set "Data" to "Email."
- Click on the password input field, open "Member Data (Input)," and set "Data" to "Password."
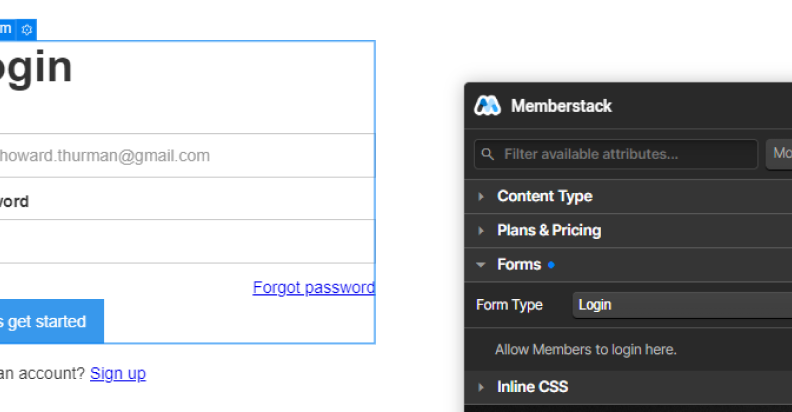
For the login form:
- Click on the form, open the "Form" dropdown menu in the app, and set "Form Type" to "Login."
- Click on the email input field, open "Member Data (Input)," and set "Data" to "Email."
- Click on the password input field, open "Member Data (Input)," and set "Data" to "Password."
In addition to signup and login, you can also create a form for changing passwords, etc.
Creating Free and Paid Plans
Step 5: Creating Plans in Memberstack
In Memberstack, click on "Plans," then "Add Plan," and you will have two options: "Free Plan" and "Paid Plan." For the Free plan, all you need to do is provide the plan name and description.

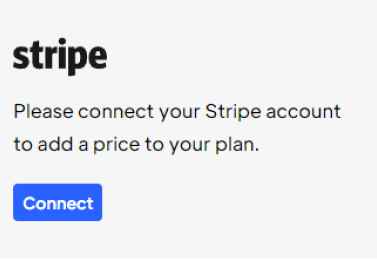
To create a Paid plan, select the "Paid Plan" option. After entering the name and description of the plan, you will need to connect to your Stripe account before entering the price for the plan. Only after connecting to Stripe can you choose between "Recurring" or "One-time" payment. If you select "One-time," the client pays for your service once, whereas selecting "Recurring" means the client will renew the plan. The renewal can be on a weekly, monthly, or yearly basis.
It's important to note that the current price set for the Paid plan cannot be changed; a new Paid plan needs to be created instead.
Step 6: Connecting the Paid Plan to Stripe
To enable payments, as mentioned earlier, you need to connect Stripe. You do this by clicking "connect" while setting up the Paid Plan, and you will be redirected to the Stripe platform. All you need to do after that is log in to your Stripe account.
Restricting Access and Redirecting
Step 7: Restricting Access for Users
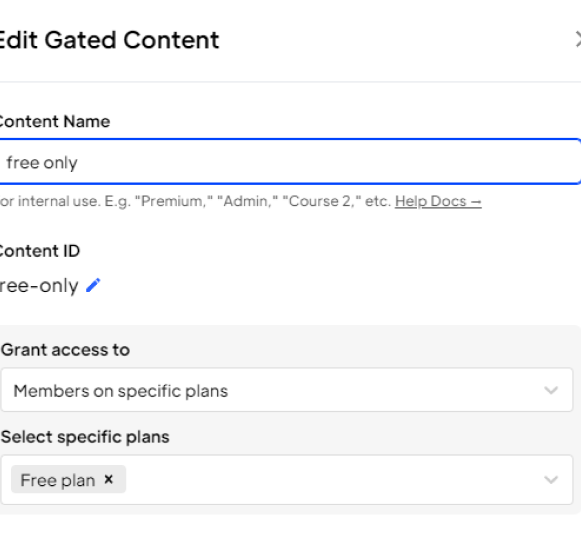
Click on the "Free plan" in the "Gated Content" dropdown, go to "Add," and under "Grant access to," set "Members on specific plans," in this case, "Free." For "Restrict specific URLs," enter the URL of the page intended only for members with the Free plan. For "Access Denied URL," enter the URL of the page where users without any plan will be redirected. This can be a page where users can register for the Free or Paid plan.
Click on the "Paid plan" and follow the same process, but under "Grant access to," set "Members on specific plans," in this case, "Paid." For "Restrict specific URLs," enter the URL of the page intended only for members with the Paid plan. For "Access Denied URL," enter the URL of the page where users without the Paid plan will be redirected. This can be a page where users can upgrade to the Paid plan.
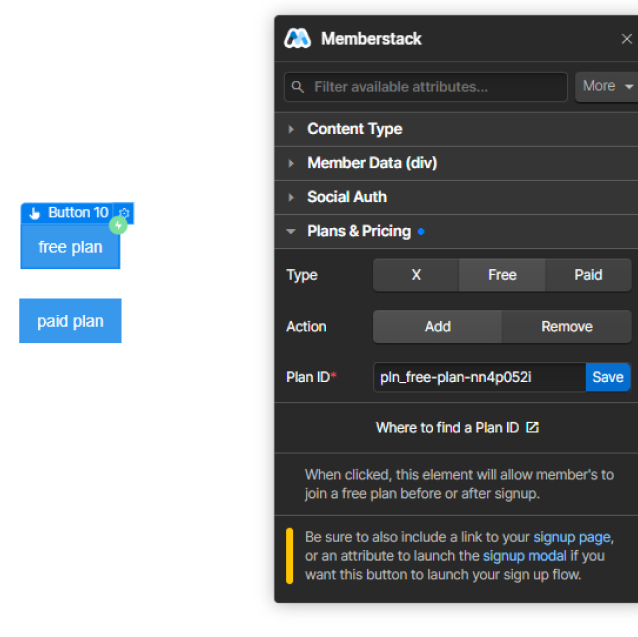
Step 8: Setting Buttons and Redirecting After Registration and Login
In our case, in Webflow, we will have two buttons: one for the "Free plan" and one for the "Paid plan." Launch the Memberstack App and click on the button intended for the Free plan. Go to the "Plans & Pricing" dropdown, set "Type" to "Free," set "Action" to "Add," and enter the free plan ID in "Plan ID." Save, and that's it.
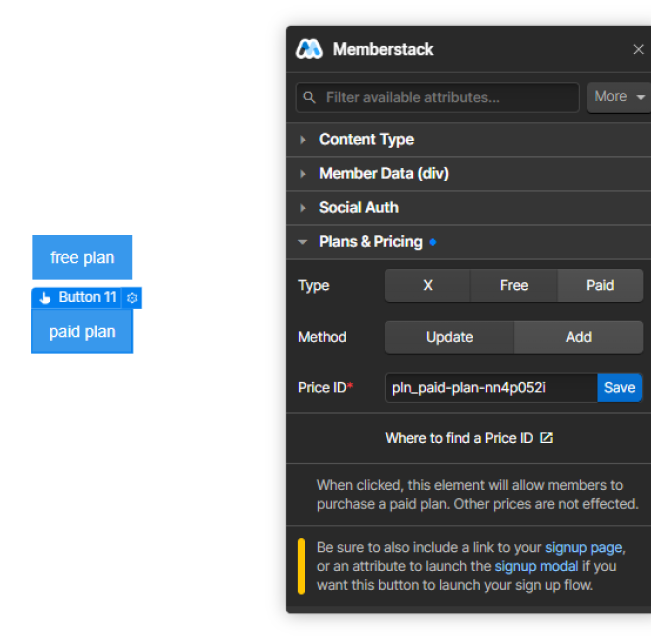
For the Paid plan, click on the button intended for the Paid plan, go to the "Plans & Pricing" dropdown, but this time set "Type" to "Paid," set "Action" to "Add," and enter the paid plan ID in "Plan ID." Save, and that's it.
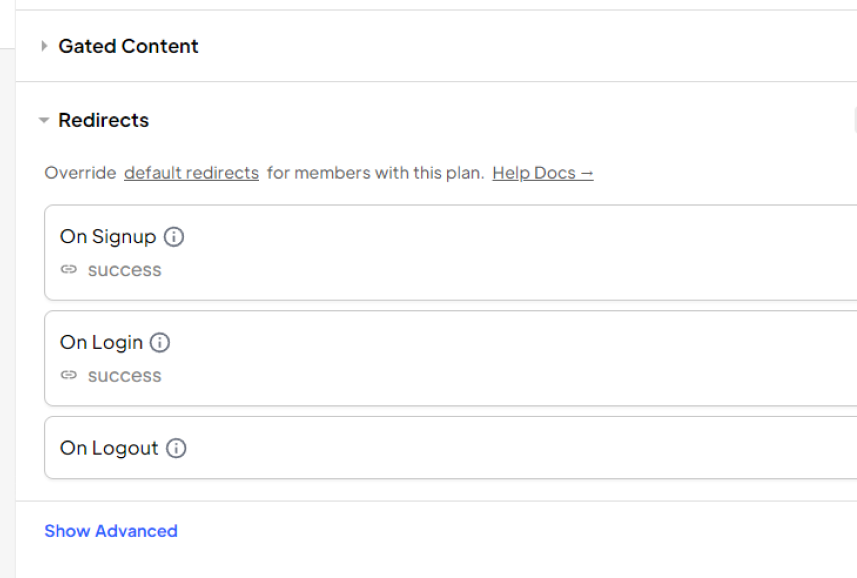
Return to Memberstack, go to "Free plan" or "Paid" in the Redirects dropdown, and you will have three options:
- Set the redirect when someone registers for the plan
- Set the redirect when someone logs in to the plan
- Set the redirect when someone logs out of the plan
All you need to do here is enter the URL where the member will be redirected.
Using the Memberstack App vs. Manual Attribute Addition
Using the Memberstack app in Webflow significantly simplifies the process of adding attributes, making it faster and less prone to errors. Manually adding attributes can be time-consuming and requires careful attention to avoid copying the wrong attribute.
As you may have noticed, using the Memberstack App automatically adds the corresponding attribute to the given element.
Creating Custom Columns in Memberstack
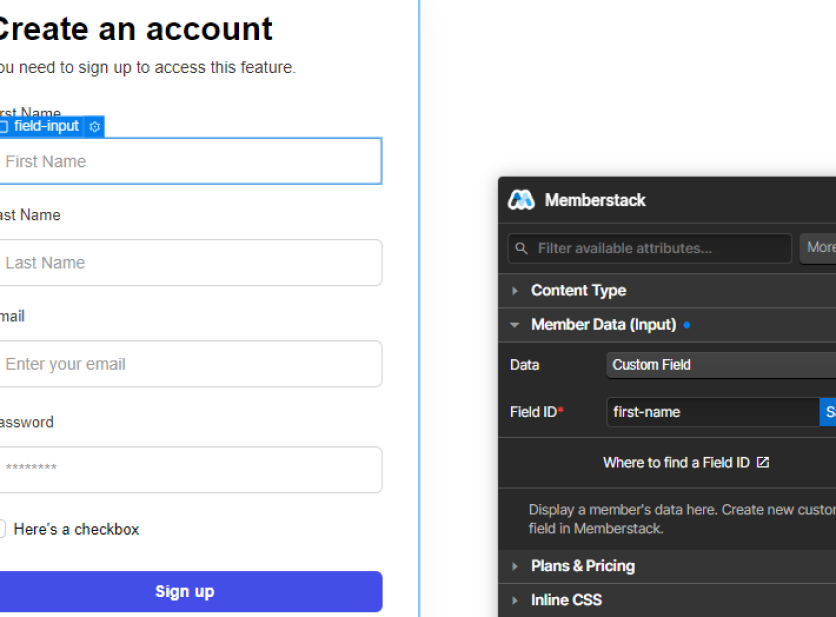
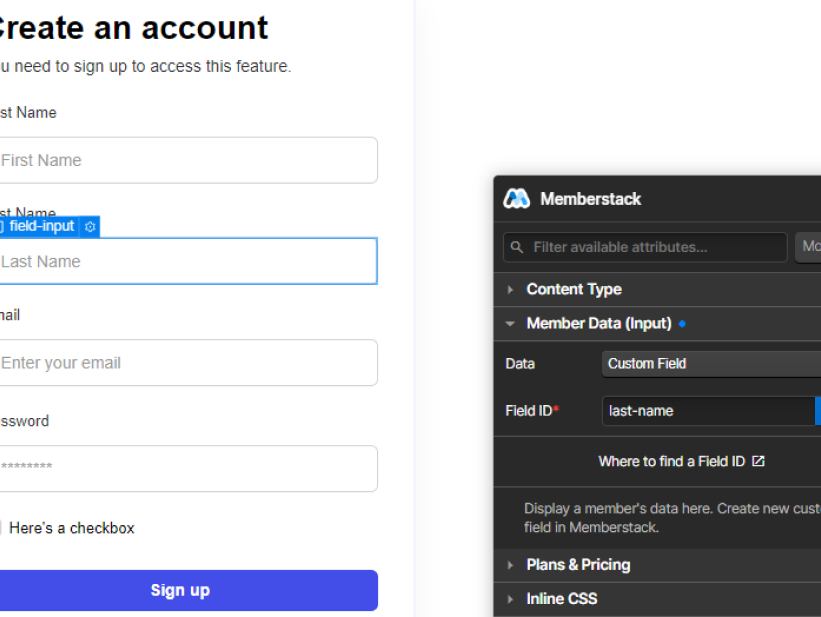
In Memberstack, you can create custom columns to display additional information about members, such as member ID, first name, last name, and more. If you are in the Memberstack dashboard, go to "Members" and in the upper right corner, select "Custom Fields." If you want clients to enter their first and last names during registration, here's what you need to do:
- Create two new input fields in the form in Webflow.
- Create two new custom fields in Memberstack.
- In Memberstack, go to the new field for the first name, copy the corresponding attributes, and paste them into the input field in Webflow intended for the first name.
- For the last name, go to the custom field created for the last name and follow the same procedure.

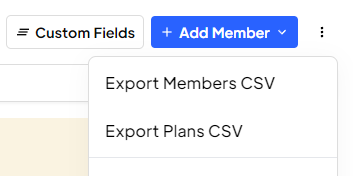
Exporting the Member List
To export the list of members from Memberstack in CSV format, go to the "Members" section and in the upper right corner under additional options, click the "Export CSV" button. This allows you to download a complete list of members for further analysis or use.
Connecting to Third-Party Services
Like most platforms, Memberstack can connect to third-party tools such as Airtable, allowing you to keep records of all members in a database and then manipulate the data more extensively from Airtable.
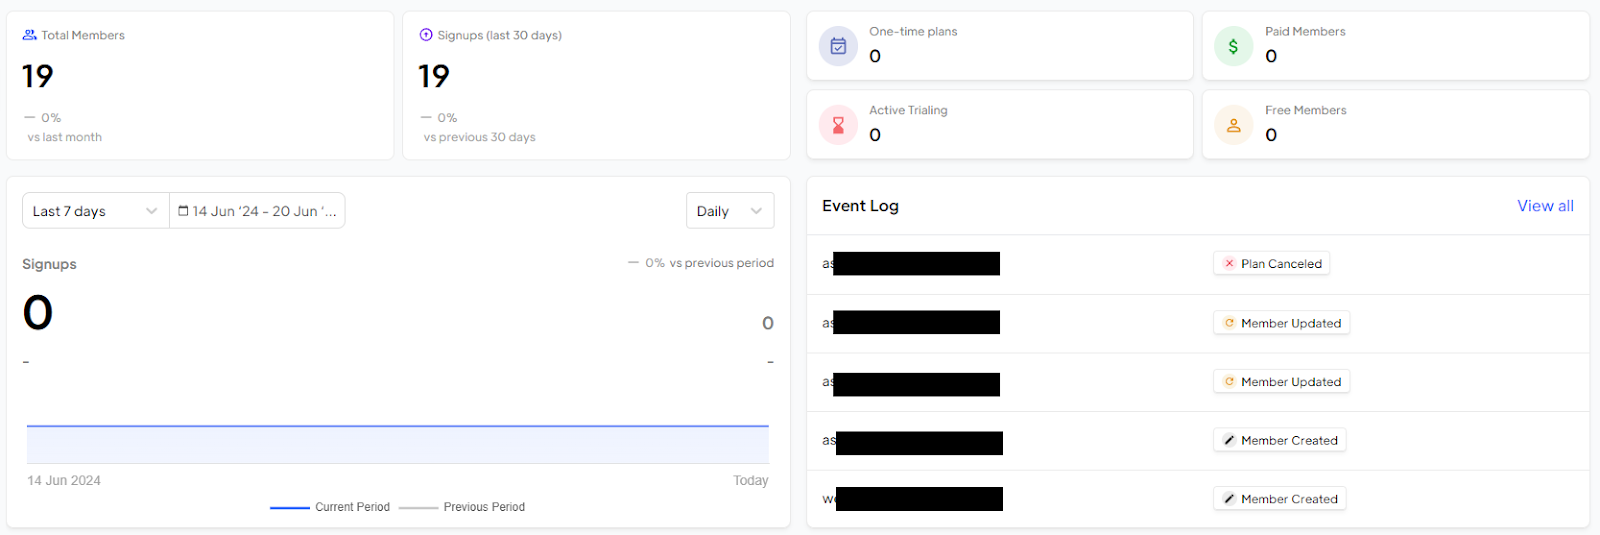
Managing Members, Filtering, and Analytics
In the Memberstack dashboard, you can view all members, filter them by plans (free or paid), and manage their access quickly and efficiently. Memberstack allows you to track member activity through analytics.
In the dashboard, you can see how many members you have, how many new registrations there were in a given period, how many members have upgraded or canceled their plans, and other relevant information. This analytics helps you better understand your users' behavior and adjust your strategies to improve the user experience.
Automation and Email Notifications
Memberstack offers the ability to automatically send email notifications to members. For example, you can set up automatic welcome emails after registration, reminders for paid plan renewals, or notifications of successful payments. This automation helps you maintain communication with your members and provide them with a better user experience.
To do this, go to "Settings," then "Email," and enable this option.
Integration with Social Networks
Memberstack can integrate with social networks to allow users to register and login easily using their existing accounts on platforms like Facebook, Google, and LinkedIn. This functionality reduces barriers to registration and improves the user experience.
Flexibility and Scalability
One of the advantages of using Memberstack is its flexibility and scalability. Whether you have a small site with a few members or a large site with thousands of members, Memberstack can adapt to your needs. You can easily scale your plans and functionalities to match the growth of your business.
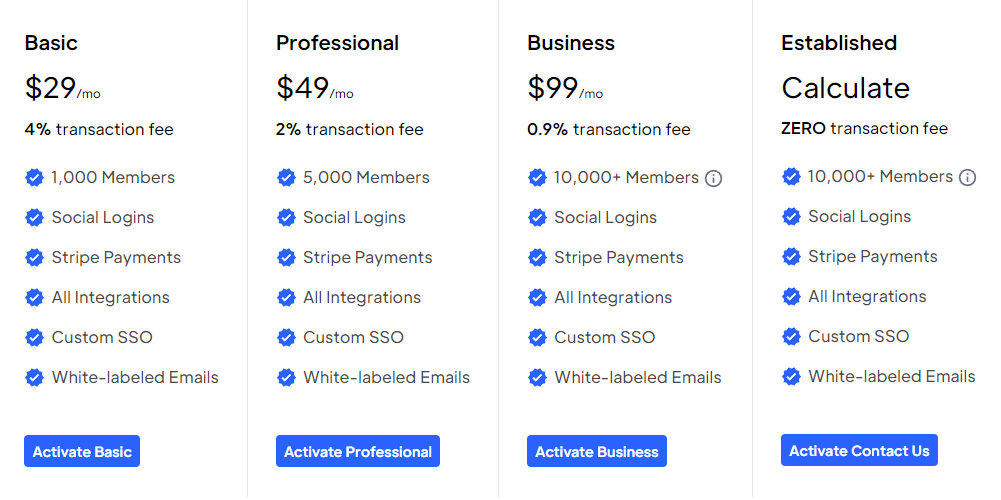
Comparing Pricing Plans
When it comes to pricing plans, Webflow offers somewhat more affordable prices, including the fact that the "Plus" plan has a 0% fee on transactions, while Memberstack only offers a 0% fee on transactions in the "Established" plan, and when comparing the prices of these two plans, the difference is significant.
The choice is yours.
.png)
.jpg)
.png)


.png)
.png)