


.svg)
Launching a website is an exciting milestone, whether you’re a seasoned Webflow developer or a client eagerly waiting to see your vision come to life. As a Webflow developer, I’ve learned that overlooking even the smallest detail can lead to significant issues down the line. This is why a comprehensive pre-launch checklist is indispensable.
Whether you’re launching a portfolio, e-commerce store, or a business website, these best practices will help you achieve a smooth and successful launch. Let’s dive in and make sure your Webflow website is ready to impress and perform from day one.
We have divided the checklist into several main sections:
- Development and Design
- Website Content
- Performance and Speed
- Functionality Testing
- SEO and Analytics
- Security Measures
Development and Design
1. Responsive Design Check
Use Webflow’s Built-in Tool: Webflow offers built-in tools specifically designed to help developers create responsive websites. The responsive design tool within Webflow allows you to effortlessly switch between different device views-desktop, tablet, and mobile-enabling you to adjust your design in real-time.
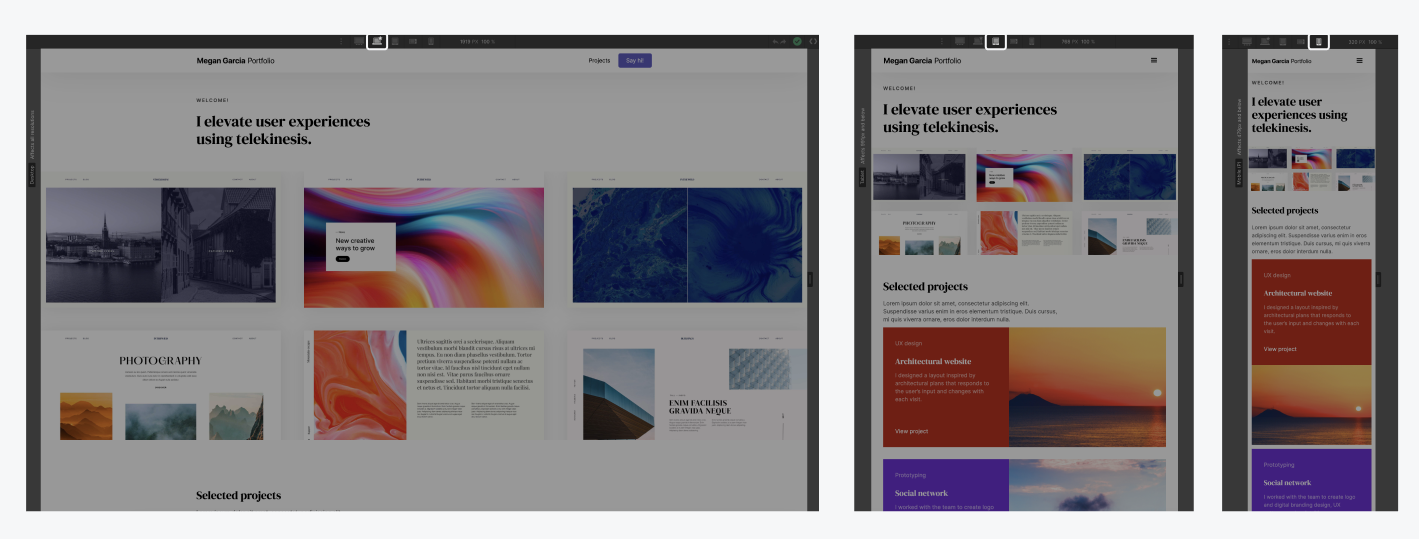
Device Preview: Use the device preview options at the top of the Webflow Designer to toggle between different screen sizes. This gives you an instant overview of how your site will look on various devices.
Adjust Layouts: Tailor your layouts for each device type. For instance, you may need to rearrange elements, resize images, or adjust padding and margins to ensure everything fits and looks right on smaller screens.
Fluid Grids and Flexible Images: Utilize Webflow’s grid system and ensure that images are set to be responsive. This ensures that your design scales appropriately across all screen sizes.
Common Adjustments and Tips
Use these common adjustments to make sure that you have a clean design structure.
Typography: Make sure that font sizes, line heights, and letter spacing are adjusted for readability on smaller screens.
Navigation: Ensure that navigation elements are easy to access and use on all devices. This might involve switching to a mobile-friendly hamburger menu on smaller screens.
By following these steps, you can create a website that performs flawlessly across all devices. A responsive design ensures that your users have a consistent and enjoyable experience, whether they’re viewing your site on a smartphone, tablet, or desktop.
2. Cross-Browser Compatibility
Ensuring cross-browser compatibility is a fundamental aspect of creating a successful website. Different browsers can interpret and render the same code in various ways, leading to inconsistencies in how a website appears and functions across different platforms.
Testing Across Major Browsers
While Webflow’s tools provide a solid foundation for cross-browser compatibility, it’s essential to test your site on actual browsers to catch any issues that might not appear in the preview mode.
Identify Key Browsers: Focus on the major browsers, including Google Chrome, Mozilla Firefox, Safari, Microsoft Edge, and Opera. These browsers cover the vast majority of web traffic.
Use BrowserStack: Tools like BrowserStack allow you to test your site on a wide range of browsers and operating systems without needing to install them on your local machine. This service provides screenshots and interactive testing environments to help you identify and fix issues.
Cross-browser compatibility isn’t just about aesthetics, it’s about ensuring that every visitor, regardless of their browser choice, enjoys a seamless and fully functional experience.
3. Interactive Elements
Incorporating interactive elements into your website is essential for creating an engaging and dynamic user experience. Interactive elements, such as buttons, forms, animations, and hover effects, not only capture users' attention but also guide them through your site, encouraging interaction and improving usability.
Interactive Elements Checklist
It's helpful to have a checklist to ensure all key interactive features are reviewed and optimized. This will help you maintain a consistent and engaging user experience across your site.
Checklist Items:
- Buttons and Links
- Forms
- Hover Effects
- Animations and Transitions
Buttons and Links: Buttons and links are fundamental interactive elements that drive user actions. Ensure all buttons and links are functional and styled consistently. Check for hover and active states.
- Consistent Styles: Define a consistent style for buttons and links, including size, color, and typography. Use Webflow’s global styles to apply these settings across your site.
- Hover and Active States: Implement hover and active states to provide visual feedback. This can include color changes, shadows, or animations.
- Accessibility: Ensure buttons and links are accessible to all users by including descriptive text.
Forms: Test all forms to ensure they are working correctly. Validate input fields and provide user-friendly error messages. Forms are crucial for user interaction, enabling visitors to sign up, contact you, or provide feedback.
- Form Styling: Use consistent styling for form elements such as input fields, labels, and buttons. Webflow’s design tools allow you to customize every aspect of your forms.
- Validation and Feedback: Implement form validation to ensure users provide the necessary information. Provide clear and user-friendly error messages. Webflow allows you to set up custom validation rules and messages.
- Submission Interactions: Enhance form submissions with interactions such as success messages or redirecting users to a thank-you page. Webflow’s interactions can be used to create smooth transitions after form submission.
Hover Effects: Apply hover effects to buttons, images, and other interactive elements to provide visual feedback to users.
- Subtle Animations: Use subtle animations to indicate interactivity without overwhelming the user.
- Consistency: Maintain consistent hover effects across similar elements to ensure a unified experience.
- Submission Interactions: Use form submissions with interactions such as success messages or redirecting users to a thank-you page.
Animations and Transitions: Animations and transitions add a unique layer to your website, making it more engaging and interactive.
- Purposeful Animations: Use animations to guide users and highlight important content. Avoid unnecessary animations that may distract users.
- Ease of Use: Implement animations that are intuitive and enhance the user experience. Webflow’s interactions and animations panel provides a range of options to create custom animations.
- Testing: Test animations on various devices to ensure they work smoothly across all platforms. Adjust the timing and easing for optimal performance.
These elements can transform a static webpage into an immersive digital experience that responds to user actions in real time.
Website Content
Content is the backbone of your website, it conveys your message, tells your story, and drives user interaction. High-quality content not only increases your site's credibility but also plays a crucial role in search engine optimization (SEO) and user retention.
1. Proofread Text
Proofreading is crucial for maintaining professionalism and credibility. Errors in spelling, grammar, and punctuation can detract from your message and undermine your site's authority.
Read Multiple Times: Review your content several times to catch different types of errors.
Use Editing Tools: Utilize tools like Grammarly or Hemingway Editor to identify and correct mistakes.
Get a Second Opinion: Have another person review your content to catch errors you might have missed.
Webflow offers intuitive text editing features that make it easy to update and refine your content. The Designer allows you to edit text directly on the page, ensuring that you can see how changes will look in real time.
Additionally, Webflow’s integration with various third-party tools enables seamless spell check and grammar correction, ensuring your content is polished and professional.
2. Create Legal and Compliance Pages
Having legal and compliance pages like Privacy Policy, Terms of Service, and Cookie Notices is essential for transparency and regulatory compliance. These pages protect both your business and your users by clearly outlining the terms of use and data handling practices.
Creating Legal Pages in Webflow
Webflow makes it easy to create and manage these critical pages. You can use templates or collaborate with legal professionals to generate the content. Organizing these pages within Webflow ensures they are easily accessible and consistently formatted.
Regular Reviews: Periodically review and update legal pages to ensure they reflect current regulations.
Clear Language: Use straightforward, accessible language to ensure users understand the terms and policies.
Legal Consultation: Work with legal professionals to draft or review your compliance content to ensure it meets all legal requirements.
3. Content Accuracy
Accurate content is vital for maintaining user trust and credibility. Providing reliable information helps establish your site as a trustworthy source, which is particularly important for topics requiring factual precision.
Regular Updates: Frequently review and update your content to keep it accurate and relevant.
Fact-Checking: Verify facts and figures from reliable sources before publishing.
Source Credibility: Use credible sources to support your content, raise its reliability and authority.
Webflow’s content management system (CMS) allows for dynamic and up-to-date content. The CMS collections feature lets you create structured content that can be easily updated, ensuring that your site always presents the most current and accurate information.
Performance and Speed
Webflow provides comprehensive features that make it easier to optimize your website for speed and performance. From image optimization to minimizing CSS and JavaScript.
1. Image Optimization
Images are a crucial part of any website, contributing to its visual appeal and user engagement. However, large or unoptimized images can significantly slow down your website, leading to longer load times and a poor user experience. Optimizing images ensures that they load quickly without compromising quality, enhancing both performance and user satisfaction.
Compress Images Before Uploading: Use tools like TinyPNG or JPEGmini to compress images before uploading them to Webflow. This reduces file sizes without significant loss of quality.
Choose the Right Format: Use JPEG for photographs, PNG for graphics with transparency, and SVG for icons and logos. Choosing the appropriate format can significantly impact load times. Consider using new Webp format for web.
Webflow automatically generates multiple sizes of each image you upload, allowing you to serve the most appropriate size for different devices and screen resolutions. This feature, known as responsive images, helps reduce load times and improve performance across all devices.
2. CSS and JavaScript
CSS and JavaScript are essential for the functionality and styling of your website. However, excessive or unoptimized code can slow down your site. Minimizing and optimizing these files can greatly enhance performance and reduce load times, resulting in a smoother and faster user experience.
Webflow’s Feature for Minimizing CSS and JavaScript automatically minifies your CSS and JavaScript files, removing unnecessary characters and spaces to reduce file sizes. Additionally, Webflow allows you to selectively load scripts, ensuring that only the necessary code is loaded on each page.
Remove Unused Code: Regularly check your CSS and JavaScript to identify and remove any unused code. This helps keep your files lean and efficient.
Load Scripts Asynchronously: Whenever possible, load your JavaScript files asynchronously or defer them. This ensures that scripts do not block the rendering of the page, improving perceived load times.
3. Check Load Times
Monitoring your website’s load times is essential for maintaining optimal performance. Slow load times can negatively impact user experience, SEO rankings, and conversion rates. Regularly checking and optimizing load times ensures that your website remains fast and responsive.
Tools and Methods: Use third-party tools like Google PageSpeed Insights, GTmetrix, and Pingdom to gain deeper insights into your site’s performance.
Regular Monitoring: Use performance tools and third-party services to regularly monitor your website’s load times. Identify any areas that need improvement.
Identify Bottlenecks: Look for performance bottlenecks such as large images, excessive scripts, or slow server response times. Address these issues to improve load times.
Implement Best Practices: Apply best practices for performance optimization, such as enabling browser caching, using a content delivery network (CDN), and optimizing your code.
These practices can significantly improve your site’s performance. By implementing these strategies, you can create a website that not only looks stunning but also performs exceptionally well.
Functionality Testing
Whether it's verifying form submissions, checking for broken links, ensuring third-party integrations work correctly, or conducting comprehensive user testing, Webflow provides the resources you need to validate your site’s functionality before launch. In this section, we will explore essential aspects of functionality testing, focusing on how to leverage Webflow’s capabilities to ensure your website is reliable and user-friendly.
1. Form Submissions
Webflow offers intuitive form creation and management tools that simplify the process of testing and validating form submissions. Within Webflow’s Designer and Preview modes, you can easily create and test forms to ensure they function as intended.
Create Test Submissions: Fill out and submit each form to ensure all fields are functioning correctly and data is transmitted as expected.
Verify Validation Rules: Ensure that all form validation rules are enforced, such as required fields, email format checks, and input length restrictions.
Check Data Reception: Confirm that form data is correctly received and processed by the designated email address or any integrated systems.
2. Broken Links
Broken links can frustrate users and harm your site's SEO. They disrupt the user experience by leading visitors to non-existent pages, causing confusion and reducing site credibility. Regularly checking for and fixing broken links is essential for maintaining a seamless and professional website.
Review and Test Links: Use Webflow’s Designer to manually review and test all links on your site to ensure they are working correctly.
Utilize Third-Party Tools: Employ tools like Broken Link Checker or Screaming Frog to identify broken links across your site.
Regular Maintenance: Regularly update and maintain links to ensure they remain functional, redirecting or updating links as necessary to avoid any disruptions.
3. Third-Party Integrations
Webflow supports various third-party integrations through built-in settings and custom code embeds. The platform’s flexibility allows you to connect with numerous external services to enhance your website’s capabilities.
Verify Configuration: Ensure that all third-party integrations are correctly configured within Webflow’s settings or via custom code embeds.
Conduct End-to-End Testing: Perform comprehensive testing to verify that data is accurately transmitted between Webflow and the integrated services.
Monitor Performance: Regularly monitor the performance of integrations and troubleshoot any issues that arise to maintain seamless functionality.
4. User Testing
User testing is crucial for identifying usability issues and gathering feedback from real users. By observing how users interact with your site, you can uncover pain points and areas for improvement that might not be apparent through internal testing alone
Recruit Diverse Users: Gather a diverse group of users to test your site, representing different demographics and technical skill levels.
Provide Specific Tasks: Assign specific tasks and scenarios for users to complete, focusing on critical functions and user flows.
Collect and Analyze Feedback: Gather detailed feedback from users and analyze their interactions to identify and address any usability issues. Use this feedback to make necessary adjustments and improvements to your site.
Functionality testing is a vital step in the development process, allowing you to identify and fix any issues that could hinder the performance or usability of your site. By meticulously testing all interactive features, you can guarantee that your website operates smoothly and meets the expectations of your users.
SEO and Analytics
This checklist covers crucial aspects of SEO and analytics setup to help you maximize your website's visibility and performance.
1. Meta Tags and Descriptions
Unique meta tags: Ensure that each page on your Webflow site has unique and descriptive meta tags, including titles and descriptions that accurately reflect the page content.
Relevant keywords: Use relevant keywords strategically within meta tags to improve search engine visibility and click-through rates.
2. Google Analytics Setup
Google Analytics Account: Sign up for a Google Analytics account if you haven’t already done so.
Integrate Google Analytics with Webflow: Paste your Google Analytics tracking ID into the designated field to connect your site with Google Analytics.
Verify Tracking Implementation: Test that Google Analytics tracking is functioning correctly by visiting your site and monitoring real-time data in your Google Analytics dashboard.
3. Disable Webflow Subdomain Indexing
When your Webflow site is hosted on a paid domain, it’s essential to ensure that only your primary domain is indexed by search engines.
- Go to the “SEO” tab in Webflow site settings.
- Find the indexing section and turn off “Webflow subdomain indexing”.
- Save and publish your site.
Disabling the indexing of your Webflow subdomain is a critical step in your pre-launch checklist to prevent duplicate content issues and ensure that search engines focus on your primary domain. When both your primary domain and Webflow subdomain are indexed, it can confuse search engines and lower search rankings.
Security Measures
In this section, we will explore critical security measures, including backup solutions, Webflow security settings, and regular security checks.
1. Backup Solution
Regular backups are essential for preventing data loss and ensuring quick recovery from issues such as data corruption, accidental deletions, or cyber-attacks. By maintaining up-to-date backups, you can restore your site to a previous state, minimizing downtime and loss of information.
Webflow provides a system that automatically creates backups of your site. These backups allow you to restore previous versions of your site with ease, providing a safety net in case something goes wrong.
Create Manual Backups: Before making significant changes to your site, create a manual backup to ensure you have a restore point.
Restore from Backups: If needed, select the desired backup version and click the restore button to revert your site to that state.
2. Webflow Security Settings
Configuring security settings is important to protect your site from vulnerabilities and unauthorized access. Properly set security measures can prevent common threats such as unauthorized access, data breaches, and other security risks.
Webflow offers security settings to help safeguard your site. These include password protection for specific pages or the entire site, as well as publishing controls to manage who can make changes to your site.
Set Up Password Protection: In your project settings, go to the Security tab and enable password protection for sensitive pages or the entire site.
Manage Publishing Permissions: Set up permissions to control who can publish changes to the site, ensuring that only authorized users can make updates.
The Webflow pre-launch checklist serves as an important step for ensuring every aspect of your website. By following the steps outlined in this checklist, you’ve taken proactive measures to guarantee that your Webflow website not only meets but exceeds expectations. From refining the design and optimizing performance to securing your site and maximizing its visibility through SEO, each task contributes to the overall success of your online presence.
I wish you success as you unveil your Webflow website to the world. Happy launching!
.png)

.png)


.png)
.png)